Wednesday, 9 November 2022
12:30 | Edit Post
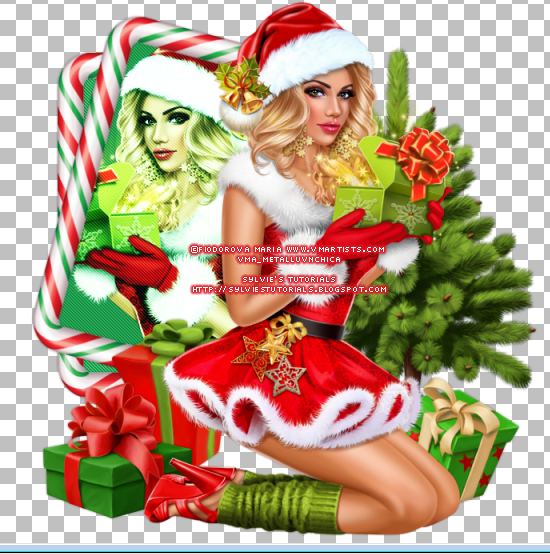
Tube - ©Fiodorova Maria - VM Artists - HERE
Scrap Kit - Doodles by Design - Unwrap the Fun - HERE
Gradient - Tonya Temptations - I used XmasGrad_Reindeer - HERE
Plugins Used:
penta.com - Jeans & Color Dot
Xero - Radiance
Preset Shapes: rectangle & circle
Mask: by Narah (1056) - I can't find a site with her masks
Unsure that I can share it, so I won't - but any mask will do in the meantime.
~~~~~~~~~~~~~~~~~~~~~~~~~~~~~~~~~~~~~~~~~~~~~~~~
1.
File - New Image - 800 x 800 - transparent
Grab 'frame 2' from the scrap kit - resize by 75%
Paste it to the left of the tube
Duplicate it
Image - Rotate - Free Rotate to the right by 15%
Floodfill them with a color from your tube or the kit
I chose #108e3f
Add a dropshadow to both of your frames.
I used 0, 0, 40, 4.00.
Paste a part of your tube over top of your floodfilled layer for the top frame.
Trim any excess off.
Image - Mirror and place it exactly where you want it.
Duplicate the tube
Change the blend mode of the bottom tube to Luminance (Legacy)
And change the blend mode to the top tube to Hard Light
Hide all layers except the top green floodfilled layer and the tubes over it.
Layers - Merge - Merge Visible
Duplicate this merged layer
Effects - Plugins - penta.com - Jeans - default settings
Lower the opacity of the top one to 40
Duplicate the layer that you lowered the opacity on
Effects - Plugins - Xero - Radiance - default settings
And lower the opacity of this layer a smidgeon more down to 26.

2.
Add dropshadow to each of these as you go, I used 0, 0, 30, 3.00.
Now, grab the element 76 from the scrap kit, resize it by 85%
Paste it to the right of your tube, coming out from behind it
Element 39 - resize by 30% - Image - Mirror - place over the tree but under main tube.
Element 36 & 32 - Resize by 30% and place to the left of the main tube
Open up 'frame7', and before posting to your canvas, duplicate it
Change the blend mode to Overlay
Now copy and paste it to your canvas, resize by 85%
Image - Free Rotate - Rotate by 90% to the right
Move this frame to the left of the tag, coming up from your previous frames.
Using your magic wand tool, click in each of the squares of the frame
while holding down your shift key so it will select them all
Add a new raster layer - floodfill it with your gradient
Lower this layer beneath the frame
Selections - None
Now add whichever part of the tube you want to use, and trim excess.
Duplicate the tubes
Change the blend modes : Luminance (Legacy) on the bottom, Soft Light on the top.
Add a dropshadow to frame, I used 0, 0, 40, 4.00.
Once again, add dropshadow as you go. I used 0, 0, 30, 3.00 again.
And look at my tag for reference on placement of elements, or go on your own!
♥
Element 3 - resize by 15%
Element 14 - resize by 40%
Element 17 - resize by 15%
Element 29 - resize by 30%
Element 30 - resize by 40%
Element 50 - resize by 40%
Element 56 - resize by 60%
Element 64 - resize by 40%
Element 100 - resize by 40%
Element 108 - resize by 40%
Element 126 - resize by 25% ( i used this twice!)
4.
Now using the same gradient you used before
Use your preset shape tool and draw a circle
Convert to a raster layer and lower it to the very bottom layer.
(I have it coming out from the top right of the tag)
Selections - Select All
Selections - Float
Selections - Defloat
Selections - Modify - Expand by 8
Add a new raster layer and lower it beneath the gradient circle
Floodfill with the color red I used #db1a25
Selections - Modify - Expand by 3
Add a new raster layer again and lower it beneath the red layer
Floodfill with your gradient once again
Selections - None
Click on your very bottom gradient layer to make it active
Adjust - Add/Remove Noise - Add Noise
Random - 42% - Monochrome: checked
Add a dropshadow, 0, 0, 40, 4.00
Now click on the red circle layer to make it active
Effects - Plugins - penta.com - Color Dot - default settings
Now, grab a part of your main tube and paste it over top of your top gradient circle.
Trim excess and duplicate the tube
Bottom change the blend mode to Luminance (Legacy) and top one to Overlay
I also added another bit of my tube at the top of the circle and lowered the layer beneath the other two
And changed the blend mode to Luminance (Legacy) and lowered the opacity to 24%.
Add sparkles of choice, your mask and your copyright.
We are now finished our tag!
Thank you so much for following along.
♥
© sylvie's tutorials.
Written November 9, 2022.
Subscribe to:
Post Comments
(Atom)
-me-


0 comments:
Post a Comment