Wednesday, 9 November 2022
12:49 | Edit Post
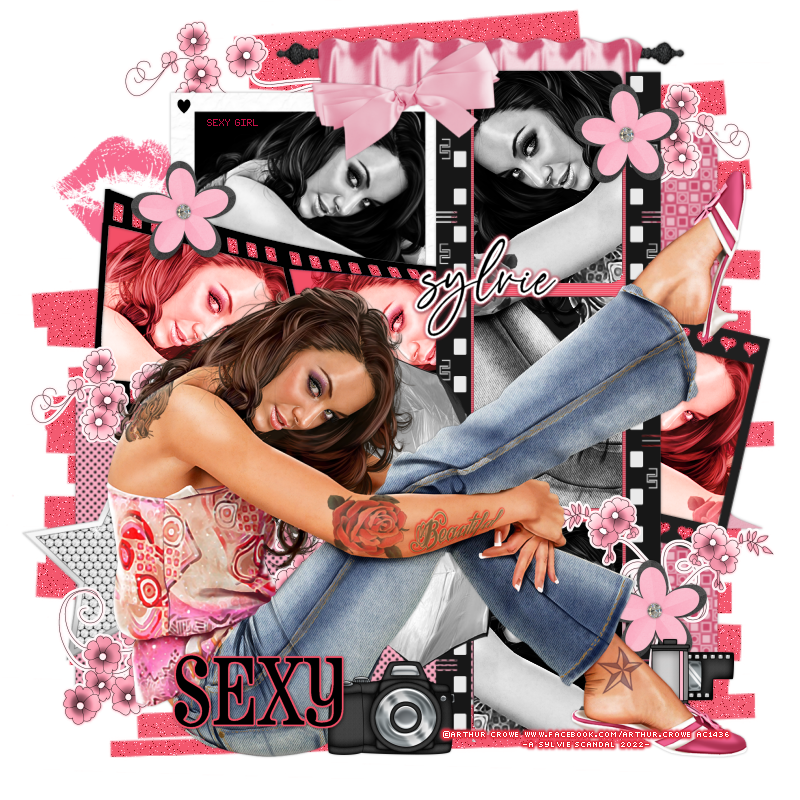
CENTERFOLD

Tube - ©Arthur Crowe - No longer for sale - Store is closed
But any tube will do if you don't have this one!
Scrap Kit - FTU Centerfold by Tamie & Vicki - Download HERE
Preset Shape Tool - Rectangle
~~~~~~~~~~~~~~~~~~~~~~~~~~~~~~~~~~~~~~~~~~~~~~~~
1.
File - New Image - 750 x 750 - transparent.
Paste your tube to the canvas.
If using the same one, I resized by 65%.
Open 'filmstrip 3' from Tamie's part of the kit, resize by 85%
Image - Rotate - Free Rotate by 90% to the left.
Place it to the right of your canvas and underneath the tube.
Now open 'filmstrip' from the kit, no resize necessary.
Right click your layer - Arrange - Send to Bottom
Move it so it comes up over top of the tube
Open 'drape' from the scrap kit and resize by 85%
I sent this to the very bottom now and coming up from behind the frame we just pasted on.
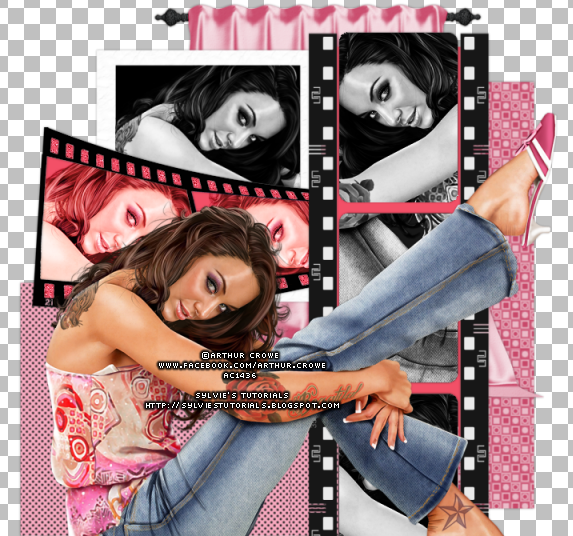
You should now have this:
Click on the filmstrip layer coming up over her head to make it active.
Using your magic wand tool, hold down your shift key and click in each small square
Selections - Modify - Expand by 2
Selections - None
Adjust - Add/Remove Noise - Add Noise
Random - 28% - monochrome: checked
Now click on the frame layer again to make it active
Using the magic wand once again, click inside the frame
Hold down the shift key to click in the second one too
Make sure both of the pink floodfilled layers are beneath the frame layer.
Add a dropshadow to the frame.
I used 0, 0, 40, 4.00.
Add a part of the tube you would like over the pink floodfilled layer.
Trim any excess and then duplicate the tube.
Change the blend mode to Luminance (Legacy) for the bottom one
3.
Paste the part of the tube you want to use over the filmstrip 3 frame.
Move it so it's exactly where you want it.
Click on that frame to make it active now.
Using your magic wand tool, click on the center 3 squares.
(holding down the shift key again)
Selections - Invert
Now click on the tube layer so it's active and hit the delete key.
Selections - None.
Adjust - Hue & Saturation - Colorize
Duplicate the tube layer
Change the blend mode to Luminance (Legacy) on the bottom
And change the blend mode to Overlay on the top.
Add a dropshadow to the frame layer now, same as before.
Using your preset shape tool, draw a pink rectangle
and place it right behind the frame.
(this way it hides all of the bits from the other frame and the drapes)
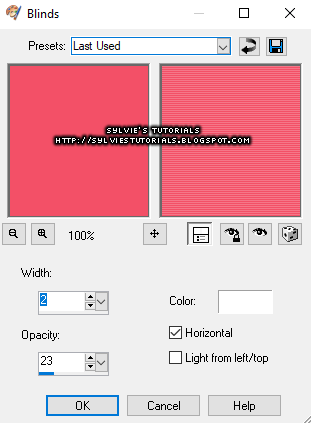
Effects - Texture Effects - Blinds

4.
Now in Vicki's part of the kit, grab 'ele2' which is the polaroid.
Resize by 60%.
And to the left of the tag.
Using your magic wand tool, use the same steps as above
And then changing the hue & saturation & changing the blend modes.
Also add a dropshadow, same as before.
Using Vicki's 'ele19' frame, i placed it to the right coming out from behind tag.
Added a tube, and used all the same steps again.
Open 'p2' (paper 2) from Tamie's portion of the kit
and the frame we just added
Add a dropshadow, same as before.
Now, Open 'pp4' from Vicki's portion of the kit
Add a dropshadow to this one too.
This is what you should have now:

5.
From Vicki's part of the kit
'Ele40' I placed these flowers in various places around the tag.
Ele20 - resize by 35%
Ele22 - resize by 25%
Ele25 - resize by 30%
Ele23 - no resizing necessary
From Tamie's part of the kit
lips - resize by 50%
StrobeUmbrella - resize by 60%
star - resize by 70%
Now add your mask of choice
(I used a Becky mask from back in the day, no longer available for DL)
Add your copyright, and tag is finished!
Thank you so much for following along!
♥
© sylvie's tutorials.
Written November 9, 2022.
Labels:centerfold,pink,sexy
Subscribe to:
Post Comments
(Atom)
-me-


Lovely tutorial Sylvie xx I am using this in my forum for a challenge ♥
ReplyDeleteAwesome tut, I cant wait to try it hun, ty so much
ReplyDelete