Showing posts with label gothic. Show all posts
Showing posts with label gothic. Show all posts
Sunday, 18 February 2024
CHOSE HERSELF

Tube ©Zindy S.D. Nielsen - available HERE
Template - Simple Circle 2 on my blog - sylly creationz - HERE
Xero - Radiance & Fritillary
penta.com - Jeans
Eye Candy 4000 - Gradient Glow
Narah Mask 0964 - HERE
Font
Pixel Font - Fixed01 - HERE
Open the template in PSP.
Shift + D to duplicate - close the original
Image - Canvas Size - 800 x 800 - Click OK
Paste the tube you want to use under the frame layer
Click on the half circle layer
Selections - Select All
Selections - Float
Selections - Defloat
Selections - Invert
Click on the tube layer to make it active, hit your delete key on the keyboard
Selections - Invert
Add a new raster layer and lower it beneath the tube layer
Selections - Select None
Duplicate the tube layer
Change the blend mode to Luminance Legacy on the bottom tube layer
And then change the blend mode to Multiply on the top tube layer
Now duplicate the top tube layer
Effects - Plugins - Xero - Radiance - default settings
2.
Selections - Select All
Selections - Float
Selections - Defloat
Add a new raster layer and floodfill with the same color as before.
Selections - Select None
Delete the white frame
Effects - Plugins - penta.com - Jeans - default settings
Effects - Plugins - Eye Candy 4000 - Gradient Glow
I added a 'thin' glow with the color #412935
3.
Using the same method as above, trim your tube using Selections
Change the blend mode of your tube to Luminance Legacy
Click on the Gray Rectangle layer, and add a dropshadow
I used 0, 0, 40, 4.00.
Image - Mirror
Click on the larger circle layer
Using same method as above once again, trim the tube
Change the blend mode to Luminance Legacy and lower the opacity to 22
Add a new raster layer and floodfill it with #412935
Selections - Modify - Expand by 8
Using the two purple colors above, I created a gradient
Floodfill this layer with the gradient and lower it beneath the floodfilled circle layer
Selections - Select None
Adjust - Add/Remove Noise - Add Noise
Random - 23% - Monochrome: Checked
Add a dropshadow of 0, 0, 40, 4.00
4.
Open your mask by Narah and resize by 86%
Paste over top of your tube layer (the one we just trimmed)
Now click on your large circle layer we just floodfilled
Selections - Select All
Selections - Float
Selections - Defloat
Selections - Invert
Click on your mask layer and hit the delete key on your keyboard
Selections - None
Change the blend mode to Overlay and lower the opacity to 40
Now ensure this mask layer is over the tube layer
Once again click on your floodfilled large circle layer to make it active
Add a dropshadow , I used 0, 0, 40, 4.00
5.
Click on the circle small layer to make it active
I changed the color to the same dark purple as before
Add a dropshadow - same as before
Xero - Fritillary - Variation: 11
Click OK.
Now paste the tube over top of this layer
I moved it to the right so it lined up with the tube under the half circle frame
Now the hair should be flowing out from behind the frame.
(see my tag for reference)
Trim excess from the tube so you can only see the hair
Duplicate the hair
Change the blend mode of the bottom layer to Luminance Legacy
Change the blend mode of the top layer to Overlay
6.
Add your Vix mask
I used the same dark purple as before
Add your credits, sparkles of choice and a name.
© sylvie's tutorials.
Written February 18, 2024.
Tuesday, 5 September 2023

Tube - ©Michi Art - available at CDO - HERE
Scrap Kit - by Tamie & Vicki - Pink & Spooky - HERE
Preset Shape Tool - Rectangle
PSP Mask by Becky - Mask016
(no longer available for download)
If you don't have it, any mask will do!
My Supplies - HERE
(contains the goth tree)
Font Used for the name: Mansfield
Creative Fabrica - HERE
File - New - New Image - 750 x 750 - transparent
Paste 'frame2' to your canvas, no resizing necessary
Add a dropshadow of 0, 0, 40, 4.00
Move it down a smidgeon on your canvas.
Add the color #ff70af to your Background and Fill Properties on your Material Palette
Using your preset shape tool, draw a pink rectangle behind the set of dots on the frame to the left
Now unhide your frame layer again.
Click on the merged layer to make it active now
Adjust - Add/Remove Noise - Add Noise
Random - 28% - Monochrome: Unchecked
2.
Now let's make a gradient to use!
Now keep the pink in your Material Palette
Add black in the Foreground & Stroke Properties of your Material Palette
Using your mouse, click on the center of one of the colors in your palette
A box should open up
Click on the gradient tab
Click the little arrow beside the picture of the current gradient
And choose 'foreground-background' in your gradient choices
It should be the two colors you have in your material palette currently
Style: Linear
Angle: 46
Repeats: 4
Click OK
Now using your gradient, use your preset shape tool again
Draw rectangles a bit bigger than the rectangles in the frame
(or you can draw one big rectangle, up to you)
This is what you should now have:

3.
Paste your tube to your canvas.
I resized the one I am using by 85%.
Add a dropshadow to your tube, I used the same as before.
Place it exactly where you want it.
Now add your tube to the gradient rectangles in your frame.
Trim off any excess
I duplicated my tubes layer
And then changed the blend mode of the bottom layer to Luminance (Legacy)
Hide all layers except the gradient rectangles and the layered tubes over those gradients
Layers - Merge - Merge Visible
Now duplicate your merged layer
On the top one, Effects - Texture Effects - Blinds
Add these settings:

Now, lower the opacity of this layer to 65.
Unhide your other layers.
4.
Now using the same gradient, and the preset shape tool again
Convert to a raster layer.
Using your raster deform tool, rotate your rectangle a bit to the left with Deform.

Click on the gradient rotated rectangle to make sure it is active.
Selections - Select All
Selections - Float
Selections - Defloat
Selections - Modify - Expand by 7
Add a new raster layer and floodfill it with black
Selections - Modify - Expand by 3
Add a new raster layer again and floodfill it with your gradient again
Selections - Select None.
Now, move your black floodfilled layer beneath your original rotated gradient.
Move your other gradient layer beneath the black layer.
Go to Adjust - Add/Remove Noise - Add Noise
Random - 36% - Monochrome: unchecked
Now, click on your black floodfilled layer to make it active
Selections - Select All
Selections - Float
Selections - Defloat
Add a new raster layer again
Click on the pink color in your material palette to open up the properties
To the right hand side, you will see the word 'Texture'
Make sure there is a check mark in that box
Now, click the arrow beside the picture of the texture
Choose 'Grid' in your options
Angle: 0
Scale: 60
Now, floodfill the new raster layer with the grid using the color pink.
Selections - Select None
Click on your black floodfilled layer again and add a dropshadow
I used the one same as before.
Using your tube again, add the bits of it you want on your main gradient layer.
I changed the blend modes to 'Soft Light'.
Here is a preview of texture in Material Palette, and my tag so far..


6.
You can use the same ones as me, or change them up..
Ele3 - resize by 30%
Ele24 - resize by 30%
Ele30 - resize by 80%
Ele16 - resize by 70%
Ele28 - resize by 70%
Ele12 - resize by 40%
Now, add your mask.
Add the goth tree I have provided in supplies for you
Add a copyright and a name.
You are now all finished with your tag!
Written September 5, 2023.
Thursday, 17 August 2023
DARK SECRETS

Tube by ©Verymany - found HERE
Scrap Kit by Tamie of Addictive Pleasures - found HERE
Mask by Dee - Dangerously Delicious Designs -
DD_FallMask_3 - no longer for download
(but any mask will do)
PSP preset shape - Rectangle
My wordart - HERE at sylly creationz
MY SUPPLIES -
Download HERE
~~~~~~~~~~~~~~~~~~~~~~~~~~~~~~~~~~~~
Okay, let's get started!
1.
Paste to your canvas, no resizing necessary
I used 0, 0, 40, 4.00
Grab a paper of choice from the kit, I used paper 8
Resize by 72% and add it to your material palette
Click on your window layer to make it active now
Using your Magic Wand Tool, click on the outside of your Window.
Selections - Select All
Selections - Float
Selections - Defloat
Selections - Modify, Contract by 5%
Adjust - Hue & Saturation - Colorize
H: 241 S: 74
2.
Grab your tube of choice.
If using the same one, I resized by 38%.
Add a dropshadow , same as before, and move the tube to the bottom of the tag.
Now add these elements:
(check my tag for placement)
leaves 3 - Resize by 50% - Paste under tube layer on each side of the tube
leaves 6 - No resizing - paste over top of the leaves layer and under the tube layer
leaves 2 - Resize by 60% - coming out from behind the gate on each side
grass 2 - Resize by 75% - paste over the window layer to the right of the tube
gargoyle - Resize by 60% - paste over the window but to the left of the tube
crow - Resize by 50% - paste to the top right of the tag
butterfly - Resize by 50% - paste to the bottom of the tag to the right side
Do the same to the butterfly and the grass you just pasted too.
3.
Now create a gradient using the colors black and #492833
Angle: 46 - Repeats: 4 - Style: Linear
Using your preset shape tool, draw a rectangle coming out from behind the right side of tag.
Make sure it's at the lowest layer.
Convert to raster layer.
Duplicate the layer and then Image - Mirror
Now you should have one on each side.
Add a part of your tube of choice over top of one of the rectangles.
Click on the rectangle layer to make it active
Selections - Float
Selections - Defloat
Selections - Invert
Now click on the tube layer and hit the delete key on your keyboard
Selections - None
Now duplicate the tube and Image - Mirror
Change the blend mode of each tube to 'Multiply'
Add a dropshadow (same as before) to the rectangle layers
4.
Now we are going to add the mask of choice.
I used one of Dee's, but if you don't have that mask, you can use any.
Her masks are no longer for download on her blog, sadly.
Grab the supplies from my download link.
Paste the 'goth tree' over top of the mask and underneath all other layers
Paste the 'weed' underneath the main tube layer on each side
Now add the copyright to your tag, add the name and we are all finished!
Thank you for following along!
Written August 17, 2023.
Saturday, 17 September 2022
HAUNTED GARDEN

Tube - ©Enys Guerrero 55-2 - available at CDO - HERE
Scrap Kit - Haunted Garden by Tamie at Addictive Pleasures - HERE
Mask - by me - Mask027 - on my blog sylly creationz - HERE
Fonts Used: Vanilla Mermaid
My supplies - HERE
Okay, let's get started!
New Image - 800 x 800 - transparent
Ele 2 - paste to your canvas
Add a dropshadow 0, 0, 30, 3.00
Paste Ele 3 over top of 2 and again add a dropshadow.
Lower down so about an inch of the first element is showing up top.
Now open 'frame' from the kit, and paste it to canvas and move it where you'd like it.
(no dropshadow to it just yet)
Ele 1 - resize by 60% - and place it at the bottom of the tag to the left.
Add a dropshadow to it.
Open 'cross' from the kit and resize it by 85%.
Move it to the right side of the tag, at the bottom.
Ele 12 - resize by 85% and move it to the bottom of the tag and move it as left as you can get it.
Right click - Arrange - Send to Bottom
Add a dropshadow
Duplicate it - Image - Mirror
You should now have this

2.
Ele 13 - resize 85% - I put this layer right above the frame layer.
Now, using your freehand selection tool - draw around the bits of paper you want to delete
Selections - None
Now open 'vine' from the kit, resize by 70%
Move it to the very right of the tag and lower the layer to the very bottom
I made it come out from beneath the tag.
Duplicate - Image - Mirror
Now duplicate again
Image - Rotate - Free Rotate by 90% to the left
Move it to the top of the tag, furthest left
Duplicate - Image - Mirror
You should now have something that looks like this

3.
Paste your tube to the canvas, I resized by 60%.
I lowered the layer just below the cross layer, and over the frame layer.
'Ivy2' from the kit, resize by 70%. Paste over the bottom of the tube.
Now duplicate the tube - Image - Mirror
Move it to the left of the frame and lower beneath the frame layer.
Trim excess off the tube, and then change the blend mode to Screen
Lower the opacity to 58%.
I pasted this just below the tube, over the ivy.
'Flower' - resize by 50% - put it to the left top corner of the frame.
4.
Open 'weeds' from my supplies.
I put one coming from behind the log and the other coming behind the cross.
Now grab the transparent flowers from my supplies and resize by 35% and paste it in front of the log
I duplicated it and brought one out from behind the cross too.
Grab the 'roses' from the supplies now
Image - Grey Scale
Now paste to canvas and lower beneath the transparent flowers and log.
Now grab my mask, and I used it with both colors: black and #534d45.
Add your copyright, sparkles of choice and tag is finished!
Thank you so much for trying my tutorial.
© sylvie's tutorials.
Written September 17, 2022.
Tuesday, 23 August 2022

Tube - from ©Verymany - Steampunk 77 - HERE
Kit - FTU by Mizteeque called All Steamed Up - HERE
Mask - Dangerously Delicious Designs - GeoMask2 - HERE
Preset Shapes - Circle
Plugins - penta.com - Color Dot
My Supplies - (tag bottom) HERE
~~~~~~~~~~~~~~~~~~~~~~~~~~~~~~~~~~~~~~~~~~
Okay, let's get started now!
1.
File - New - New image - 750 x 750 - transparent
Open 'el 34' from the scrap kit and paste it to your canvas
Image - Rotate - Free Rotate by 90% to the left.
Open 'el 33' from then kit, paste it to the canvas and move it below the frame.
Now, open 'paper 17' from the kit.
Resize it by 68% and paste it just beneath the frame but over the rectangle layer.
Using your magic wand tool, click inside of the frame.
Selections - Modify - Expand by 15
Selections - Invert
Now make your paper layer active and hit the delete key.
Now add the round frame 'el 74' and resize it by 50%.
Place it over top of the rectangular layer and under the frame, coming out from the left.
2.
Open your tube of choice, I am using Steampunk_77 by Verymany.
Paste it to your canvas as the very top layer.
Duplicate it, and move this one below the frame layer
Image - Mirror
Move it to the left of the top tube.
Click on the paper layer to make it active.
Selections - Select All
Selections - Float
Selections - Defloat
Selections - Invert
Click on the tube under the frame layer, hit the delete key.
Selections - None.
Duplicate the tube layer under the frame
Now, with the bottom one change the blend mode to Luminance (Legacy)
Do the same with the small round frame, only change the top blend mode to Screen this time.
This is what you should have now.

3.
Elements to Add:
These are all over top of the frame layer mostly..
and at the bottom of the tag
(add a dropshadow to each layer as you go)
el 12 - resize by 25%
el 55 - resize by 30%
el 6 - resize by 60%
(el 6 and el 57 were placed over the tube in center of the tag)
Now, I duplicated el 57 and moved to the right of the tag
lower it over top of the rectangular layer that we have beneath the frame
so it's coming out from the side
el 43 - resize by 50%
el 4 - resize by 25%
el 42 - resize by 50%
And well, any other elements you'd like!
Swap some elements, shake it up and make it your own!
♥
4.
Now, I am working on coming out from behind the tag
Open el 10 and resize it by 60%.
Image - Rotate - Free Rotate by 90% to the right.
Drop this layer to the very bottom and move it coming out from the right side of the tag.
Duplicate the layer
Image - Mirror
Now, I duplicated the gear layers (el 6 and el 57)
Drop them to the bottom layer and bring them out from the top and sides.
el 62 - resize by 40%
5.
Open up el 78
Also open up your paper 17 again that we used earlier
Resize it to 68%.
Now go to your material palette and go to Patterns to find your paper.
Click on el 78 to make it active
Selections - Select All
Selections - Float
Selections - Defloat
Add a new raster layer and floodfill it with the paper.
Hide the original layer and then copy and paste it to the canvas.
Resize it by 50%.
Add it coming out from the top left corner of the tag.
Add a dropshadow.
6.
Now, open up the tag bottom you downloaded in my supplies.
Make this come out from each side of the tag at the bottom.
Now, I used my preset circle shape and added the circles to each side, and one at the top.
I added dropshadow and used penta.com (color dot, original settings) on them.
These are not necessary either, I just used them as a filler and to add some dark color .
Lastly, using any font of choice, add the word STEAMPUNK to the front on the metal piece.
Now add your mask, sparkles of choice and watermark.
We are all finished with this tag!
© sylvie's tutorials.
Written August 23, 2022.
Thursday, 12 May 2022
LIMITED EDITION
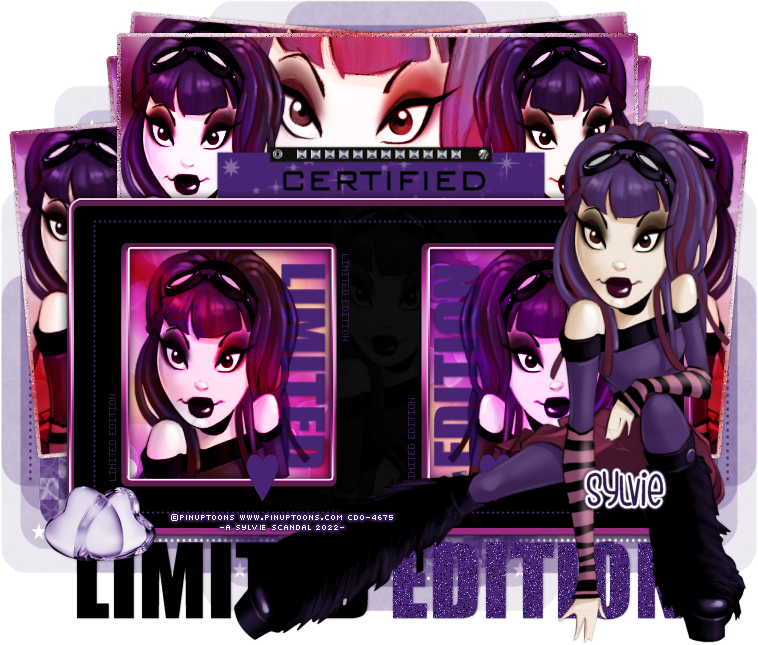
Supplies
TUBE - Pinuptoons 100-3 - Available at CDO HERE
FRAME - Available on my blog - sylly creationz - for download HERE
GRADIENT - Tonya's Temptations - TBT_Autumn18_13 - Blog HERE
TEXTURE or PAPER of choice - I used a rainbow bokeh pattern, but can't provide it sorry.
MASK - Vix Mask 458 - Download HERE
Fonts Used
Impact: for words inside frame
Fixed_01 - pixel font
Flying Foxes - font used for the name
Preset Shapes
heart
rectangle
SUPPLIES (accents) - Download HERE
Okay, let's get this party started.
1.
New - New Image - 750 x 750.
Paste the tube onto your canvas - resize by 60%.
Paste your frame of choice onto your canvas, I used #9 - Purple.
Move your tube to the right of your frame, as pictured above.
Add dropshadow, I used 0, 0, 30, 3.00.
Now add a dropshadow to your frame also. Same one.
2.
Set your material palette to your gradient of choice.
Using your preset shape tool, draw a rectangle beneath your frame so that both open areas are filled in.
Paste a part of your tube on one side of the frame over the gradient layer.
Duplicate the tube, and change the blend mode on the bottom to 'Luminance Legacy'
Change the blend mode on the top one to 'Soft Light'
Now duplicate them both - Image - Mirror so that it's on the other side too.
I also added the tube to the center of the frame.
Adjust - Hue: 0 Saturation: 0 to make it monochrome
Trim the tube, and then lower the opacity to 6.
With your preset shape tool set to rectangle, draw a rectangle over the tubes, color #60457a
Now change that blend mode on that layer to 'Overlay'.
Make sure that layer is directly above the tubes layer.
3.
Paste your texture of choice over top of the gradient layer.
Trim it so it is not coming from behind the frame on sides, top or bottom.
If necessary, change the color to match your tag colors.
I changed mine to Hue - 192; Saturation - 71
Now change the blend mode of the texture layer to 'Overlay'.
Using the color #60457a - I typed the words 'LIMITED' and 'EDITION'
I used 'Impact' font, size 48.
Rotate them by 90 degrees and place them right between the texture and tube layers.
Hide the main tube layer, merge all other layers.
Layers - Merge - Merge Visible
Unhide your tube layer again.
So far, this is what you should have:

4.
Now, using your preset shape tool again, draw a rectangle coming out from top of the frame.
I used all the same steps as above, using the texture, tubes and blend modes.
For the closeup in the middle, I used blend modes: Luminance (Legacy) & Screen.
Hide the frame and tube layers, and merge visible the rest of the layers.
Now with that layer active:
Selections - Select All
Selections - Float
Selections - Defloat
Selections - Modify - Expand by 4
Add a new raster layer and flood fill with the gradient again.
Lower it beneath the rectangle layer we just made.
Adjust - Add/Remove Noise - Add Noise
Random - 20% - Monochrome: Checked
Add a dropshadow.
Now, merge visible once again.
Duplicate this layer.
Duplicate the rotated one - Image - Mirror
Make the rectangle layer active again.
Duplicate once again - Image - Rotate - Free Rotated by 5%
Right click the layer, Arrange - Send to Bottom
Bring it out from behind the frame to the right
(see my tag for reference)
Duplicate layer - Image - Mirror.
Make it so it's coming out from under the frame.
Add a dropshadow, same as before.
Line Style: diamond Width: 2.00 Color: #482574
Background & Fill Properties: transparent
Draw a dotted rectangle in front of the frame layer.
Objects - Align - Center in Canvas
6.
Add your accents (provided in the zip 'Supplies')
Add your text to the bottom of the tag, using Impact font, Size 72
Add the word 'Certified' to the purple rectangle, using Bank Gothic font, Size 28
Add some sparkles of choice.
Add your mask, copyright/credits and name.
Written May 12, 2022.
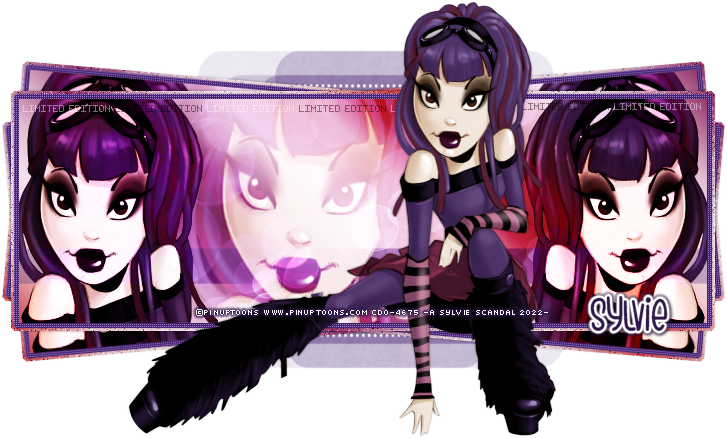
I made my set into a full forum set!

Wednesday, 5 January 2022
ROCKATTUDE
♥

SUPPLIES NEEDED
Artwork of ©Elias Chatzoudis - from MyPSPTubes - no longer open
Elias' artwork is now currently being sold at CDO - HERE
Artwork of ©Elias Chatzoudis - from MyPSPTubes - no longer open
Elias' artwork is now currently being sold at CDO - HERE
Scrap Kit: Reineke Designs - called 'Rock Guitar' - no longer available, I can't find it.
(Was at SNCO though.) - but any kit will do if you don't have it!
Template: 'Rockattude' - provided in my supplies - from my old blog Eye Candii
Masks: Tonya's Misfits Choice Mask HERE on CM blog
and my Mask 02 from my blog Sylly Creationz HERE
Screws: Dozibaer - HERE (bottom one)
Plugins:
Penta.com - Jeans
Mura's Meister - Copies
Fonts:
Peignot - HERE
Fixed_01 (pixel) - HERE
Jahannam Balla (for the name) - HERE
My Supplies - DOWNLOAD HERE
♥
(Was at SNCO though.) - but any kit will do if you don't have it!
Template: 'Rockattude' - provided in my supplies - from my old blog Eye Candii
Masks: Tonya's Misfits Choice Mask HERE on CM blog
and my Mask 02 from my blog Sylly Creationz HERE
Screws: Dozibaer - HERE (bottom one)
Plugins:
Penta.com - Jeans
Mura's Meister - Copies
Fonts:
Peignot - HERE
Fixed_01 (pixel) - HERE
Jahannam Balla (for the name) - HERE
My Supplies - DOWNLOAD HERE
♥
~~~~~~~~~~~~~~~~~~~~~~~~~~~~~~
A Pre-Tutorial Note:
In this tutorial, I used an oldie but a goldie from Elias Chatzoudis.
This is also an old template of mine, back when my blog was Eye Candii..
We're talking years ago now, so apologize for the state of my template.
Nothing merged and a kajillion layers.
So, my suggestion is, click on what you want to work with using your cursor, and then work with it, rather than searching for names of layers.
So that is how we will roll with this tutorial, rather than naming the layers, I'll tell you what I'm doing. MUCH easier, lol.
In this tutorial, I used an oldie but a goldie from Elias Chatzoudis.
This is also an old template of mine, back when my blog was Eye Candii..
We're talking years ago now, so apologize for the state of my template.
Nothing merged and a kajillion layers.
So, my suggestion is, click on what you want to work with using your cursor, and then work with it, rather than searching for names of layers.
So that is how we will roll with this tutorial, rather than naming the layers, I'll tell you what I'm doing. MUCH easier, lol.
1.
Open up the template, and Shift + D, close the original.
Now open your tube of choice, so you can match colors a bit easier.
I started by adding papers, gradients and changing the colors of the template layers to match my tag.
So, to start, click on all of the dotted circle layers, change the color to suit your tag.
Then click on the glitter layers in the tags and change the color to match your tag.
This will be a huge job done..
Open up the template, and Shift + D, close the original.
Now open your tube of choice, so you can match colors a bit easier.
I started by adding papers, gradients and changing the colors of the template layers to match my tag.
So, to start, click on all of the dotted circle layers, change the color to suit your tag.
Then click on the glitter layers in the tags and change the color to match your tag.
This will be a huge job done..
You can add gradients in place of the noisy glitter layers too, if you choose.
Too change the color of any of the layers ,
Too change the color of any of the layers ,
go to Adjust - Hue & Saturation - Colorize - I used H: 216 H: 92
If you are going to add a gradient, or paper in any of the layers, do so by this method..
Selections - Select All
Selections - Float
Selections - Defloat
Add a new layer, and then paste your paper or add your gradient.
I always hide or delete the original layer
(if you think you might change something, just hide it.. better to use the original layer)
Add your noise, or use a plugin, and then add a drop shadow of choice.
2.
So now you should have all of your colors changed, papers added, etc.
Let's add the gradient now to the circle layers, if you haven't already done that.
Click the layer to make it active, use the selections method used above, and add your gradient of choice.
The white circle layers above your gradient layers, I changed them to purple by the same selections method above.
Hide the original layer, and then I used the Penta.Com - Jeans plugin to them.
Default settings.
If you are going to add a gradient, or paper in any of the layers, do so by this method..
Selections - Select All
Selections - Float
Selections - Defloat
Add a new layer, and then paste your paper or add your gradient.
I always hide or delete the original layer
(if you think you might change something, just hide it.. better to use the original layer)
Add your noise, or use a plugin, and then add a drop shadow of choice.
2.
So now you should have all of your colors changed, papers added, etc.
Let's add the gradient now to the circle layers, if you haven't already done that.
Click the layer to make it active, use the selections method used above, and add your gradient of choice.
The white circle layers above your gradient layers, I changed them to purple by the same selections method above.
Hide the original layer, and then I used the Penta.Com - Jeans plugin to them.
Default settings.
Add a drop shadow of choice.
3.
At this point, I deleted all my hidden layers I don't need anymore.
Then I hid all of my active layers, except the two gradient layers.
Make sure one of the gradient layers are active.
Layers - Merge - Merge Visible.
3.
At this point, I deleted all my hidden layers I don't need anymore.
Then I hid all of my active layers, except the two gradient layers.
Make sure one of the gradient layers are active.
Layers - Merge - Merge Visible.
Unhide all of your layers again.
Make sure the newly merged gradient layer is active.
We are now going to use our tube, or a piece of the tube to fill our gradients.
Paste it onto your canvas so it is right above the merged gradient layer.
I used the bottom half of my tube, by cutting off the legs from the tube.
But you can use a full tube if you wish, to may want to resize it if your tube is large.
Once pasted onto your canvas, go to Mura's Meister - Copies
Then choose Wallpaper (rotate) in the dropdown menu.
Change the Number by sliding the button over until it looks like the screen is full of your tube,
Make sure the newly merged gradient layer is active.
We are now going to use our tube, or a piece of the tube to fill our gradients.
Paste it onto your canvas so it is right above the merged gradient layer.
I used the bottom half of my tube, by cutting off the legs from the tube.
But you can use a full tube if you wish, to may want to resize it if your tube is large.
Once pasted onto your canvas, go to Mura's Meister - Copies
Then choose Wallpaper (rotate) in the dropdown menu.
Change the Number by sliding the button over until it looks like the screen is full of your tube,
with not much openings in between.
It will be different for everyone depending on the tube and how much of that tube you choose to use.
Hit the 'Ok'.
Your canvas should be full of that tube, and that is all you can see..
Lower this layer to just above the gradient layers you did, if it isn't already there.
Click on your merged gradient layer now.
Selections - Select None
Selections - Float
Selections - Defloat
Selections - Invert
Click on the wallpaper layer, and hit the delete button.
Selections - None.
Duplicate your wallpaper layer now.
Change the blend mode of the bottom one to Luminance (legacy)
And change the blend mode of the top layer to Screen.
Add a drop shadow to the gradient layer.
4.
This is where we start to pretty it up some more.
Choose some elements from the kit you are using.
From the kit I am using, these are the elements I chose. Check tag for placement if using the same one.
Elements 2, 7, 15, 17, 22, 30, 32, 33, 36, 38, 45, and 46.
Add a drop shadow of choice to each..
Now in the tutorial supplies, and the accents provided you can add to the tag,
It will be different for everyone depending on the tube and how much of that tube you choose to use.
Hit the 'Ok'.
Your canvas should be full of that tube, and that is all you can see..
Lower this layer to just above the gradient layers you did, if it isn't already there.
Click on your merged gradient layer now.
Selections - Select None
Selections - Float
Selections - Defloat
Selections - Invert
Click on the wallpaper layer, and hit the delete button.
Selections - None.
Duplicate your wallpaper layer now.
Change the blend mode of the bottom one to Luminance (legacy)
And change the blend mode of the top layer to Screen.
Add a drop shadow to the gradient layer.
4.
This is where we start to pretty it up some more.
Choose some elements from the kit you are using.
From the kit I am using, these are the elements I chose. Check tag for placement if using the same one.
Elements 2, 7, 15, 17, 22, 30, 32, 33, 36, 38, 45, and 46.
Add a drop shadow of choice to each..
Now in the tutorial supplies, and the accents provided you can add to the tag,
again looking at my tag for placement.
I used only one of the Rockattudes from the wordart on the template, and moved it to one of the sides.
Add a drop shadow and then duplicate it.
I used only one of the Rockattudes from the wordart on the template, and moved it to one of the sides.
Add a drop shadow and then duplicate it.
Image - Mirror.
Move it to where you want it on the other side.
Using your pixel font, add the words 'rockattude' to the top of the black rectangles.
Using the font Peignot - type the word 'Rockattude' to the small rectangle.
Add the screws by Dozi to each side of that rectangle.
5.
Add your masks, name and watermark to the tag and call it finished!
Thank you so much for trying my tutorial.
♥
©sylvie's tutorials
Written January 5, 2022.
Using your pixel font, add the words 'rockattude' to the top of the black rectangles.
Using the font Peignot - type the word 'Rockattude' to the small rectangle.
Add the screws by Dozi to each side of that rectangle.
5.
Add your masks, name and watermark to the tag and call it finished!
Thank you so much for trying my tutorial.
♥
©sylvie's tutorials
Written January 5, 2022.


Subscribe to:
Posts
(Atom)