Showing posts with label wordart. Show all posts
Showing posts with label wordart. Show all posts
Tuesday, 4 January 2022
HUGS AND KISSES

Plugins: I used Penta.com - (ColorDot & Jeans), Layout Tools (Contrast Checkers)
& Toadies (What Are You?)
Mask: I used my own mask SC_Mask044, available on my blog HERE
Fonts Used: pixel font Fixed_01 HERE & Artisan Signature - available HERE
Century Gothic (came with my PSP)
Fonts Used: pixel font Fixed_01 HERE & Artisan Signature - available HERE
Century Gothic (came with my PSP)
Rectangle & Heart Preset Shape Tool
My Wordart: Hugs And Kisses Valentine - on my blog HERE
My Supplies (accents) - HERE or HERE
(included are my preset & heart accent)
Not supplied - sparkles (any will do), texture (no longer available for download)
~~~~~~~~~~~~~~~~~~~~~~
My Wordart: Hugs And Kisses Valentine - on my blog HERE
My Supplies (accents) - HERE or HERE
(included are my preset & heart accent)
Not supplied - sparkles (any will do), texture (no longer available for download)
~~~~~~~~~~~~~~~~~~~~~~
Now let's get started!
1.
Grab my selection (syl_selection01) from supplies and add it to your selections folder.
(My selections folder is under My PSP Files under Documents)
(My selections folder is under My PSP Files under Documents)
New image 750x750
Add the tube to your canvas (I used a closeup).
Place to the left of your canvas, and then duplicate it
Image - Mirror.
Layers - Merge - Merge Visible.
Add a new layer to your layer palette and floodfill with a color of choice.
I used #f795da.
2.
Go to Selections
Load Save Selection - Load Selection From Disks
Using the dropdown, choose my selection 'syl_selection01'
Make sure 'Source Luminance', 'Replace Selection' and 'Invert Selection' are the only ones ticked off..
Now click on load.
You will see marching ants around the border of your canvas, as well as the selection I made you.
Click on each layer in your layer palette and hit the delete button.
Place to the left of your canvas, and then duplicate it
Image - Mirror.
Layers - Merge - Merge Visible.
Add a new layer to your layer palette and floodfill with a color of choice.
I used #f795da.
2.
Go to Selections
Load Save Selection - Load Selection From Disks
Using the dropdown, choose my selection 'syl_selection01'
Make sure 'Source Luminance', 'Replace Selection' and 'Invert Selection' are the only ones ticked off..
Now click on load.
You will see marching ants around the border of your canvas, as well as the selection I made you.
Click on each layer in your layer palette and hit the delete button.
Selections - Select None.
Make your color layer active.
Ensure it is still over top of the tubes layer.
Change the blend mode to 'soft light'
Now Layers - Merge - Merge Visible.
3.
Now duplicate your merged layer twice, and hide the two top layers.
Click your unhidden layer to make it active.
Using Toadies - What Are You? X-Dose: 30 and Y-Dose: 30
Click Ok..
Use Layout Tools Plugin, Contrast Checkers - default settings
Make your color layer active.
Ensure it is still over top of the tubes layer.
Change the blend mode to 'soft light'
Now Layers - Merge - Merge Visible.
3.
Now duplicate your merged layer twice, and hide the two top layers.
Click your unhidden layer to make it active.
Using Toadies - What Are You? X-Dose: 30 and Y-Dose: 30
Click Ok..
Use Layout Tools Plugin, Contrast Checkers - default settings
Duplicate this layer.
Image - Rotate - Free Rotate - Left - 25.00
And then duplicate - Image - Mirror.
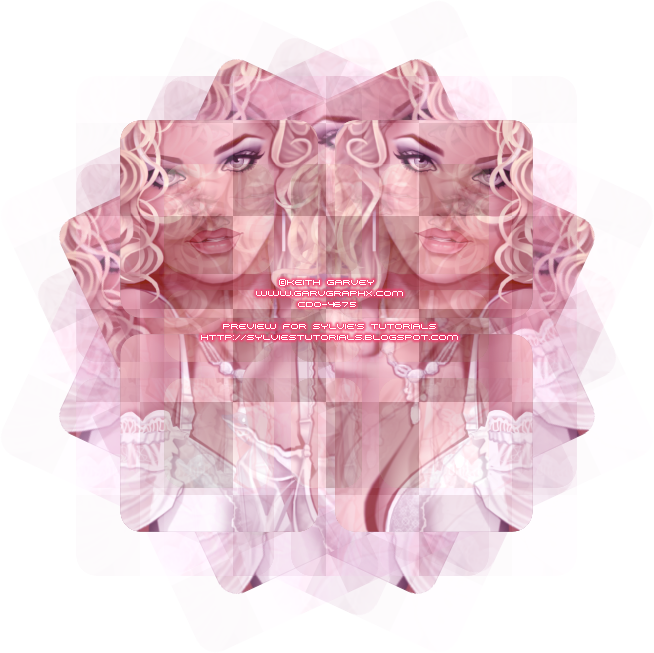
Next, unhide the middle next bottom hidden layer.
Using the penta.com plugin, choose ColorDot - default settings.
Again go to Image - Rotate - Free Rotate by 15.00 to the left
And then duplicate - Image - Mirror.

4.
Unhide your top hidden layer and make it active.
Selections, Select All
Selections, Float
Selections, Defloat
Selections - Modify - Expand by 5.00
Add a new layer and floodfill with the same color you chose earlier.
Lower this layer beneath the top layer.
Using your Penta.com plugin, use Jeans - default settings
Add drop shadow of choice.
And then duplicate - Image - Mirror.
Next, unhide the middle next bottom hidden layer.
Using the penta.com plugin, choose ColorDot - default settings.
Again go to Image - Rotate - Free Rotate by 15.00 to the left
And then duplicate - Image - Mirror.
4.
Unhide your top hidden layer and make it active.
Selections, Select All
Selections, Float
Selections, Defloat
Selections - Modify - Expand by 5.00
Add a new layer and floodfill with the same color you chose earlier.
Lower this layer beneath the top layer.
Using your Penta.com plugin, use Jeans - default settings
Add drop shadow of choice.
Selections - Modify, Expand by 3.00
Once again add a new layer.
Floodfill with a gradient or color of choice.
Lower this one beneath the color Jean layer.
Adjust - Add Noise
Random - 46% - Monochrome: checked
Add drop shadow of choice.
Selections - Select None.
Now click on the top layer to make it active
Duplicate it . Then click on the top one making it active.
Use penta.com - ColorDot on the duplicated layer at the top - default settings again.
Lower the opacity to 30%.
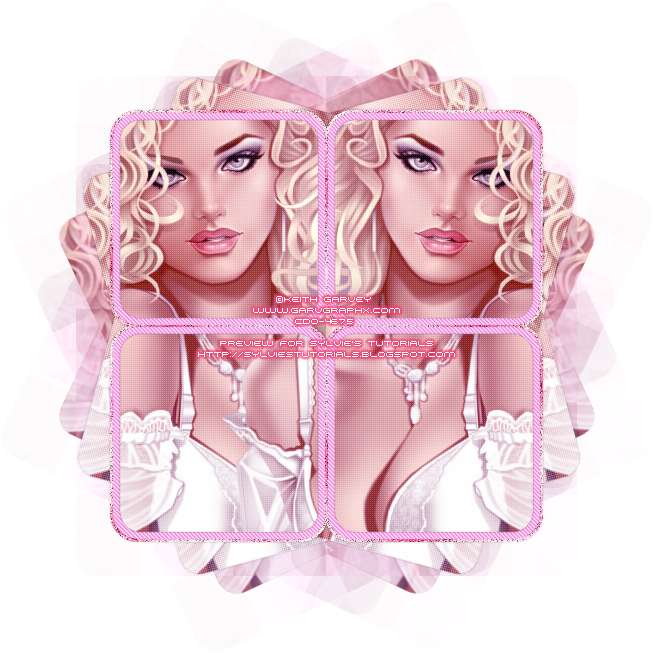
5.
Now, let's add your main tube and place it where you would like it.
Use a sparkle of choice to add it over the tag - lower beneath the tube layer.
Go to the rectangle tool, Horizontal and Vertical Radius set to 20.00,
Once again add a new layer.
Floodfill with a gradient or color of choice.
Lower this one beneath the color Jean layer.
Adjust - Add Noise
Random - 46% - Monochrome: checked
Add drop shadow of choice.
Selections - Select None.
Now click on the top layer to make it active
Duplicate it . Then click on the top one making it active.
Use penta.com - ColorDot on the duplicated layer at the top - default settings again.
Lower the opacity to 30%.
5.
Now, let's add your main tube and place it where you would like it.
Use a sparkle of choice to add it over the tag - lower beneath the tube layer.
Go to the rectangle tool, Horizontal and Vertical Radius set to 20.00,
Line Style: solid, Width: 0.00
Draw a rectangle just below the tube for her to sit on, if you have chosen a tube that is sitting down.
Use the same settings as above in step 4
(Selection - Modify, Jeans Plugin, Adding noise, etc)
This is where I used the texture, for the top rectangular layer.
Use any texture or paper of choice, the one I used is no longer available for download.
Adjust - Hue & Saturation - Colorize - H: 219 S: 198
(if you need to colorize what you use and using the same color scheme)
Use the same settings as above in step 4
(Selection - Modify, Jeans Plugin, Adding noise, etc)
This is where I used the texture, for the top rectangular layer.
Use any texture or paper of choice, the one I used is no longer available for download.
Adjust - Hue & Saturation - Colorize - H: 219 S: 198
(if you need to colorize what you use and using the same color scheme)
Add drop shadow of choice to each layer.
Paste your wordart over top of the rectangle.
Add drop shadow.
6.
(please see my tag for reference on the placements of everything in this step)
Grab your heart accent from my supplies. Paste to each side at the top of the tag.
Using preset shape tool, draw a small heart. Move to one side of the tag.
Duplicate it. Image - Mirror.
Now, draw a bit larger size heart, and move to the top corner of the rectangle.
Duplicate it. Image - Mirror.
Effects - Texture Effects - Blinds -
Width: 2.00, Opacity: 40.00, Color: white, Horizontal: checked
Using your pixel font, add the Happy Valentine's Day to each side of the tag.
Then, using the Century Gothic font, Size: 30
Type out 'XO' on each side of the wordart.
New Image - 500x500 - floodfill with the same color as above.
Use the mask on it. Merge Group.
Paste it onto your tag to the left.
Right click the mask layer - Arrange - Send to Bottom
Duplicate it. Image - Mirror.
Now duplicate it one more time and move it to the top.
Add your watermark, a name and now your new tag is all finished!
Paste your wordart over top of the rectangle.
Add drop shadow.
6.
(please see my tag for reference on the placements of everything in this step)
Grab your heart accent from my supplies. Paste to each side at the top of the tag.
Using preset shape tool, draw a small heart. Move to one side of the tag.
Duplicate it. Image - Mirror.
Now, draw a bit larger size heart, and move to the top corner of the rectangle.
Duplicate it. Image - Mirror.
Effects - Texture Effects - Blinds -
Width: 2.00, Opacity: 40.00, Color: white, Horizontal: checked
Using your pixel font, add the Happy Valentine's Day to each side of the tag.
Then, using the Century Gothic font, Size: 30
Type out 'XO' on each side of the wordart.
New Image - 500x500 - floodfill with the same color as above.
Use the mask on it. Merge Group.
Paste it onto your tag to the left.
Right click the mask layer - Arrange - Send to Bottom
Duplicate it. Image - Mirror.
Now duplicate it one more time and move it to the top.
Add your watermark, a name and now your new tag is all finished!
Thank you so much for following along with my tutorial.
©sylvie's tutorials
Written January 4, 2022.
©sylvie's tutorials
Written January 4, 2022.
I turned this tag into a full set.
Here are the other 2 parts of this 3 piece set!
♥
Here are the other 2 parts of this 3 piece set!
♥


Wednesday, 20 May 2020
Prince Charm

I made this into a 3 piece forum set.
This tutorial is for the main tag only, though.
You can see the other 2 pieces at the bottom of this tutorial.
♥
This tutorial is for the main tag only, though.
You can see the other 2 pieces at the bottom of this tutorial.
♥
Materials Needed:
Tube - Prince Charm by Vi Nina HERE
PTU Scrap Kit - by Kizzed by Kelz - called Prince Charm HERE
Gradient - Tonya's Temptations - Spring 20_12 HERE
Plugins - Mura's Meister - Copies
Fonts Used:
KG Eyes Wide Open - (for the name)
KG Eyes Wide Open - (for the name)
My supplies: (wordart i made) - download HERE
*♥*♥*♥*♥*♥*♥*♥*♥*♥*♥*♥*♥*♥*♥*♥*♥*♥*♥*♥*♥*
Now let's get started!


1.
New image - 750 x 750.
Paste your tube of choice onto your canvas. I used frog-1 of Prince Charm.
If using the same one, resize by 40%, and add a dropshadow.
2.
Open element 121, resize by 80% and paste to the right side of the tag, behind tube.
Element 101 - resize by 80% and again paste to right, right in front of grass.
Element 54 - paste it down at the bottom of grassy bits, moving it out to overlap a bit.
Element 24 - paste it over top of the grass down low again. I added a slight dropshadow to it.
Element 14 - resize by 35% and paste down in at the bottom of grassy bits next to the frog.
Here is an image of what I have so far:

When you are happy with what you have, hide the tube layer and merge the rest together.
Duplicate the merged layer and Image - Mirror.
Element 2 - paste it right behind the frog, lowering it level with other grassy bits.
I moved it behind some of the lower front grass and flower.
Now I shifted the frog a bit to the right to see the flower and butterfly behind it.
Element 6 (lilypad) - No resize.
Paste it and lower it to the lowest layer, coming out from bottom of the tag.
Duplicate - Image- Mirror.
3.
Element 38 - resize by 50%. (leave it right in the center of the canvas)
Effects - Plugins - MuRa's Meister - Copies
Select 'Encircle' in the list - change the 'Number' to 7. Don't touch other numbers. Click OK.
Move this behind the 2 frames.
Element 41 - Image - Flip
(we are flipping it just to prevent the branch from sticking out of the outer edges)
(we are flipping it just to prevent the branch from sticking out of the outer edges)
Effects - Plugins - MuRa's Meister - Copies - same settings
Move it behind all layers.
Element 109 - resize by 25%. I placed it in 3 places to the right of tag behind frames and flowers.
Also, added one at the very top. Just wanted to add some splashes of yellow in there.
4.
Now paste these random elements to your tag from the scrap kit:
With each of these elements - duplicate them and Image - Mirror to add to the other side.
Element 9, resize by 50%. paste to the right, coming out from behind the grass, etc
Element 85 - resize by 30%. Move it behind all other layers again coming out from top.
Element 40 - resize by 60%. Move it the very lowest layer so it's coming up from behind grass.
In your material palette, make or add your gradient of choice.
I am using one of Tonya's, listed above.
Using your square preset shape tool, draw a square and move it beneath a frame.
Right click the layer and 'convert to raster layer'.
Duplicate it. Image - Mirror.
Duplicate your tube, and place it over the gradient layer under the frame on one side.
Duplicate the layer. Image - Mirror.
Duplicate the tube layers again and change bottom to Luminance (Legacy) and top to Screen.
5.
These elements I did not duplicate and mirror:
Element 42 - resize by 60%. Move it to the right of the frog coming out from behind it.
Element 4 - resize by 20%. Add to the front of the tag, next to the frog to the right.
Element 17 - resize by 30%. Paste it at the top left of the tag over the flowers.
Element 112 - resize by 30%. Paste it on the left hand side of tag, very front, bottom.
Element 13 - resize by 40%. Paste center and coming up behind the frames.
6.
Now, open the supply file I provided above, and grab the circular wordart I made.
Or you can make one of your own.
I made the wordart so you can use the white back and shadow, or remove them.
Your choice.
Once you've pasted it on, use your preset shape tool to add a small heart between words at the top.
It's just to fill in that space a bit. I used a different shade of green from the tag.
It's just to fill in that space a bit. I used a different shade of green from the tag.
7.
Now you can add your masks.
I used 2 of my own from my blog, listed above.
Add sparkles if you desire. I used some from the kit and some of my own.
Add your copyright and add your name.
We are all finished!
Thank you sooooo much for trying out my tutorial.
♥♥♥
©sylvie's tutorials.
Written May 20, 2020.


Tuesday, 28 April 2020
Timeless Beauty

Materials Needed:
My Tiles Template (in supplies)
My Wordart (also in supplies)
Plugins: David's Blend Filter, Penta.com, Toadies
Tube of choice - I used ©Barbara Jensen - Ooo La La HERE -
Gradient of choice - (to match tube or make your own like me using 2 colors )
Fonts of choice - I used Copperplate Gothic Bold, Anjel Script, Clarice Script and Fixed_01
Mask of choice - I used AR315 Mask 040 - Found on Aqua's blog HERE
Download Tutorial Supplies
♥
(my tiles template, wordart, and accents included)
1.
Open my tiles template from supplies.
Press shift key + 'D' key to duplicate it. Close off original.
Expand your canvas by going to Image - Canvas Size - 750 x 750.
Go to Selections: Select All, Selections: Float, Selections: Defloat,
Floodfill with your gradient of choice using 2 colors that will match your tube.
Selections - None. Do not delete the tile template layer yet.
Now grab your closeup version of your tube (or regular sized tube)
Paste it onto your canvas over top of your gradient layer.
Move it to the far left of the template, placing it where you want it.
Duplicate it - Image - Mirror, so it is now to the right as well.
Duplicate it one more time and then move it to the middle.
Click on your tile template layer to make it active and once again
Go to Selections: Select All, Selections: Float, Selections: Defloat, Selections: Invert
Then click on your all 3 of your tube layers one at a time and hit your delete key with each.
Selections None.
Using your Freehand Selection tool, trim off the excess of the tubes that you don't want visible..
Hide all layers except the tube layers - Merge Visible.
Duplicate the tube layer.
Change the blend mode of the bottom one to Luminance Legacy and the top to overlay.
Screenshots below.
Hide your tile template layer and merge the gradient and tube layers together.


2.
Click on your tile template layer once more to make it active.
Go to Selections: Select All, Selections: Float, Selections: Defloat, Selections: Expand by 7
Add a new raster layer and floodfill it with the color black.
Again, Selections: Select All, Selections: Float, Selections: Defloat, Selections: Expand by 3
Now floodfill with your gradient once more.
Selections: None
Adjust: Add/Remove Noise - Add Noise - Random - 40%
Add a dropshadow: Offset Vertical: 0, Horizontal: 0, Opacity: 30, Blur: 3.00, Color: Black
Now make your black filled layer active .
Go to Effects, Plugin - penta.com - Color Dot, default settings.
Same dropshadow.
3.
Now, click on your gradient/tube merged layer to make it active.
Duplicate it - Image - Rotate - Free Rotate - Right: checked - Free: checked by 10.00 - Click OK.
Right click the duplicated layer and select 'Arrange' and 'Send to Bottom'.
Once again, duplicate the same gradient/tube layer at the top
This time, rotate it to the left, and lower it to the bottom too.
Effects: Plugins - Toadies - What Are You - default settings on each of the 2 bottom layers.
Then Effects: Plugins - Layout Tools - Contrasting Checkers -
default settings on each of the 2 bottom layers again.
Adjust - Hue & Saturation - Colorize: H: 13 - S: 250 on each of them
(or use a color to match your tube here if you aren't using the same tube)
Merge these 2 bottom layers - and then resize by 90%.

4.
Go to your preset shape tool - choose square
Change the Line Style to Diamond and change the width to 2.00
Now, hide the Background and Fill Properties by clicking the 'Transparent' button.
And change the Foreground and Stroke Properties to black.

Now, draw a square around one of the corner tiles of the template.
Using your selection tool, delete the 2 unnecessary sides to the square that overlap.
You now have a dotted half square. Duplicate it and Image - Mirror.
Then duplicate that one, and Image - Flip.. Then, once more duplicate it. Image - Mirror.
Hide all of the layers except those four dotted shape layers.
Layers - Merge - Merge Visible. Unhide the layers again.
Add a small dropshadow, same as above but changing Opacity to 20 and Blur to 2.00.
5.
Add the full size tube now over top of all layers, placing it where you want it.
Go to your preset shape tool, and draw out a square, color: black, Line style: solid, width: 0
Make it about the same size as the tiled template.
And lower it just on top of the rotated back layers we made earlier.
Effects - Texture Effects - Weave -
Gap Size: 1, Width: 2, Opacity: 1, Weave Color: white, Gap Color: orange, Fill Gaps: checked
Open (from supplies) the 'chromestaroverlay'
Paste it to each side of your tag
(beaneath main tube layer)
Open the large orange star - resize by 40%. Paste it beneath the square layer you just drew.
I duplicated it a few times and moved it to each side to show bits coming out.
Now apply your mask of choice, I used Aqua's linked above in supplies.
Lower it to the very bottom layer.
6.
Paste the 'Timeless' wordart I made to the tag, and resize by 50%.
Add a thin glow of whatever color to match your tag around the wordart.
Using the Anjel Script font, I typed in Beauty in black.
(see my tag for example)
Using the Copperplate Gothic font, I typed the word beauty in square one and square three. Lower the opacity to 24%.
Using the 'fixed_01' pixel font, type out the words timeless beauty at the top of your tag.
Make the tile template layer active again..
Go to Selections: Select All, Selections: Float, Selections: Defloat, Selections: Invert
Make your pixel words layer active and hit the delete key. It will delete the excess.
Select None.
Now make sure this layer is underneath your main tube layer.
Lastly, I added a very small black rectangle at the bottom of the tag.
Mainly just to bring out the wordart some, and used the same penta settings as before.
Add a dropshadow, same as before.
Lastly, I added a very small black rectangle at the bottom of the tag.
Mainly just to bring out the wordart some, and used the same penta settings as before.
Add a dropshadow, same as before.
7.
Now the finishing touches!
I added 4 teeny stars
(2 at the top, 2 at the bottom) .
Add your copyright and your name!
For my tag, I used Clarice Script font for the name.
For my tag, I used Clarice Script font for the name.
All finished!! Woohoooo!
Thanks so much for following along with my tutorial and giving it a go!
©sylvie's tutorials.
Written April 28, 2020.
Wednesday, 4 December 2019
CIRCULAR TEXT
(Circular Wordart)
(Circular Wordart)

(you may save the wordart I've made to use for your creations also)
Materials Needed
Font of choice: I used Skinny Sunbeams HERE
Preset Shape Tool: circle/ellipse
Super easy tutorial!
You can use circular text on your tag creations or as a wordart, as you see above.
Resemblance to any other tag or tutorial is purely coincidental.
Super easy tutorial!
You can use circular text on your tag creations or as a wordart, as you see above.
Resemblance to any other tag or tutorial is purely coincidental.
My tutorials come from my lil' 'ol tired but creative brain, lol.
First, let's draw a circle with the preset shape tool.
Create on Vector: checked, Line style: solid, Anti-Alias: checked
Make the circle as big as you want - it will be the size of your wordart.
Do not convert it to a raster layer though, leave it as vector.
(where the arrow is pointing in the image below)
Now go to Objects - Align - Center in Canvas to center it.
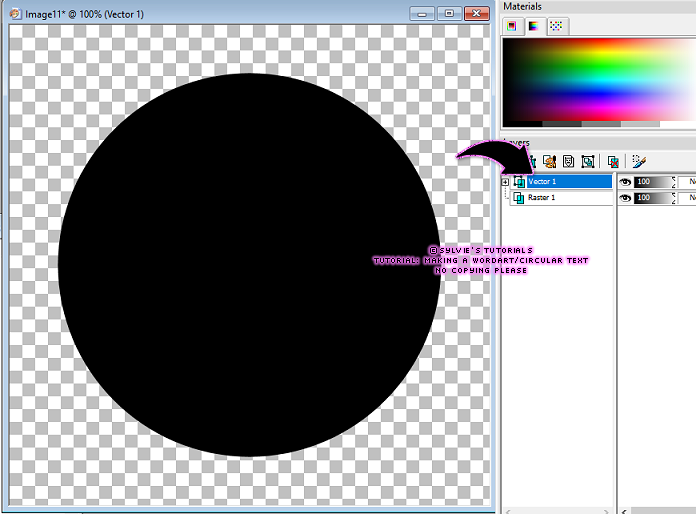
Now that you have the circle drawn, and it's still a vector, click on your font tool.
Select the font you want to use for your text on your tag and/or your wordart.
You will see dotted lines appear all around your circle now.
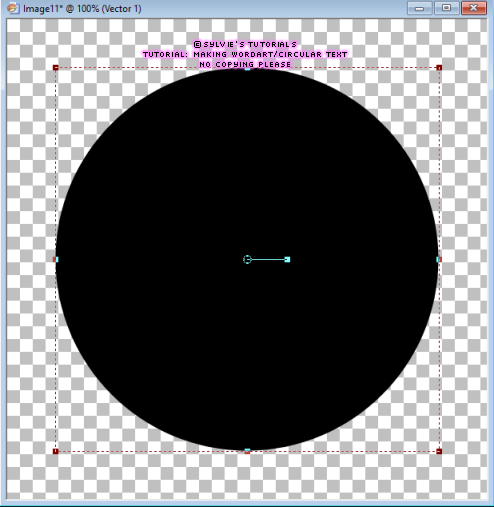
Using your mouse, hover right at the edge of your circle and you will see an arc appear underneath the letter 'A' / your cursor. This means you will be creating circular text.
Before you click and start typing though, add a new raster layer above your circle.
While still clicked on your new raster layer, hover your mouse at the edge of the circle again.
Click at the edge and your font box will pop up for you.
Start typing what you want your text to say, using the color you want.
You will see it working it's way around the circle shape.
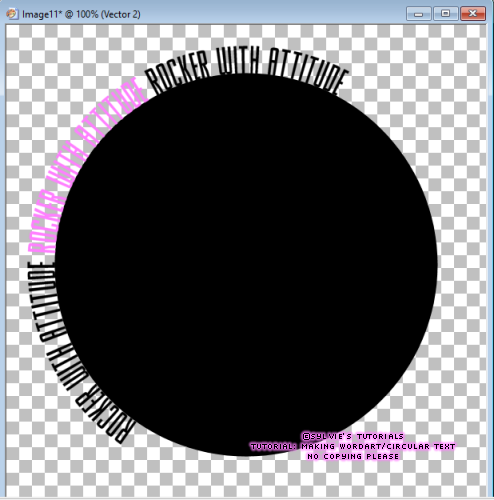
Once you get all of the text typed out as you want it, your layer palette should look like this.
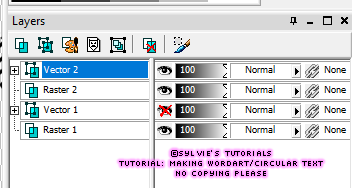
The bottom vector layer is your circle, and the top vector is your text.
First, convert your text vector to a raster layer, then delete the circle vector if you are happy with what you've made.
If you are working on a tag, I usually draw the circle right onto my tag and work between all of the tag layers I have, that way you can measure by drawing the circle the exact size you need to fit the text in. Then just delete the circle vector layer when done and continue on.
That said, see how easy that was?
Now you can make circular text any time you want, and create circular wordarts too!
I'd love to see any wordart you make, and/or tags you make using this technique.
If you struggle with my explanation in any way, feel free to email or message me.
I'll always respond as soon as I can, promise!
Thank you for following along!
Here is a tag I made just today using circular text to show you it on a tag point of view.
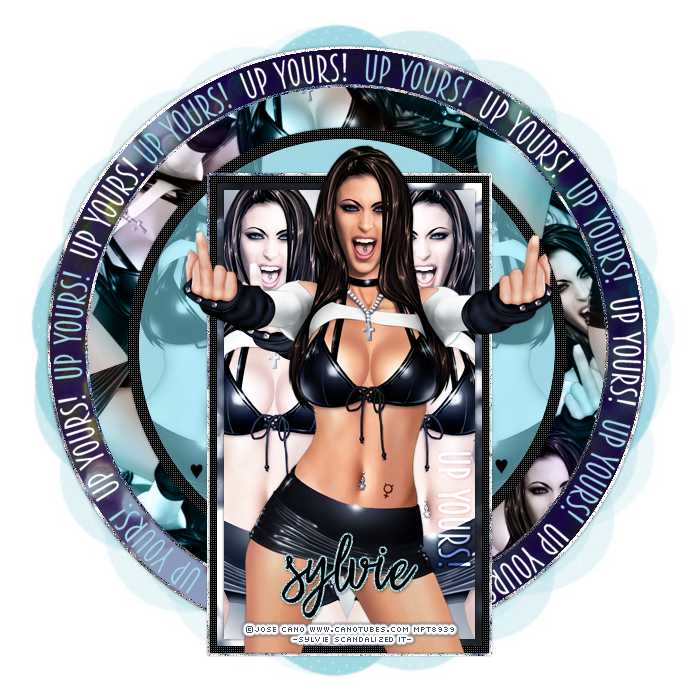
©sylvie's tutorials
Written December 4, 2019.
Subscribe to:
Posts
(Atom)