Tuesday, 5 September 2023
16:22 | Edit Post
Tube - ©Michi Art - available at CDO - HERE
Scrap Kit - by Tamie & Vicki - Pink & Spooky - HERE
Preset Shape Tool - Rectangle
PSP Mask by Becky - Mask016
(no longer available for download)
If you don't have it, any mask will do!
My Supplies - HERE
(contains the goth tree)
Font Used for the name: Mansfield
Creative Fabrica - HERE
File - New - New Image - 750 x 750 - transparent
Paste 'frame2' to your canvas, no resizing necessary
Add a dropshadow of 0, 0, 40, 4.00
Move it down a smidgeon on your canvas.
Add the color #ff70af to your Background and Fill Properties on your Material Palette
Using your preset shape tool, draw a pink rectangle behind the set of dots on the frame to the left
Now unhide your frame layer again.
Click on the merged layer to make it active now
Adjust - Add/Remove Noise - Add Noise
Random - 28% - Monochrome: Unchecked
2.
Now let's make a gradient to use!
Now keep the pink in your Material Palette
Add black in the Foreground & Stroke Properties of your Material Palette
Using your mouse, click on the center of one of the colors in your palette
A box should open up
Click on the gradient tab
Click the little arrow beside the picture of the current gradient
And choose 'foreground-background' in your gradient choices
It should be the two colors you have in your material palette currently
Style: Linear
Angle: 46
Repeats: 4
Click OK
Now using your gradient, use your preset shape tool again
Draw rectangles a bit bigger than the rectangles in the frame
(or you can draw one big rectangle, up to you)
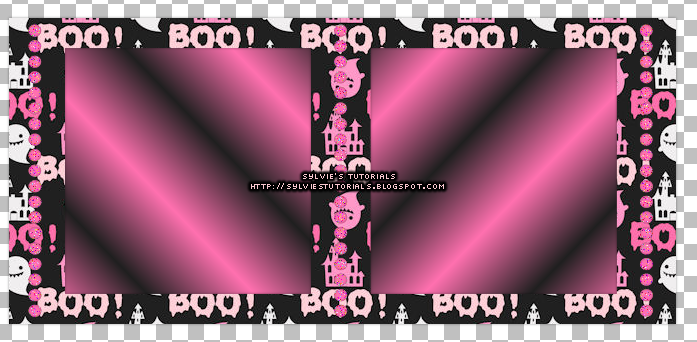
This is what you should now have:

3.
Paste your tube to your canvas.
I resized the one I am using by 85%.
Add a dropshadow to your tube, I used the same as before.
Place it exactly where you want it.
Now add your tube to the gradient rectangles in your frame.
Trim off any excess
I duplicated my tubes layer
And then changed the blend mode of the bottom layer to Luminance (Legacy)
Hide all layers except the gradient rectangles and the layered tubes over those gradients
Layers - Merge - Merge Visible
Now duplicate your merged layer
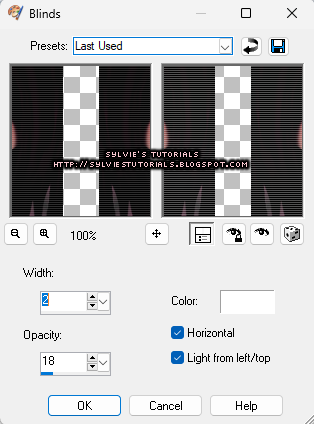
On the top one, Effects - Texture Effects - Blinds
Add these settings:

Now, lower the opacity of this layer to 65.
Unhide your other layers.
4.
Now using the same gradient, and the preset shape tool again
Convert to a raster layer.
Using your raster deform tool, rotate your rectangle a bit to the left with Deform.
Click on the gradient rotated rectangle to make sure it is active.
Selections - Select All
Selections - Float
Selections - Defloat
Selections - Modify - Expand by 7
Add a new raster layer and floodfill it with black
Selections - Modify - Expand by 3
Add a new raster layer again and floodfill it with your gradient again
Selections - Select None.
Now, move your black floodfilled layer beneath your original rotated gradient.
Move your other gradient layer beneath the black layer.
Go to Adjust - Add/Remove Noise - Add Noise
Random - 36% - Monochrome: unchecked
Now, click on your black floodfilled layer to make it active
Selections - Select All
Selections - Float
Selections - Defloat
Add a new raster layer again
Click on the pink color in your material palette to open up the properties
To the right hand side, you will see the word 'Texture'
Make sure there is a check mark in that box
Now, click the arrow beside the picture of the texture
Choose 'Grid' in your options
Angle: 0
Scale: 60
Now, floodfill the new raster layer with the grid using the color pink.
Selections - Select None
Click on your black floodfilled layer again and add a dropshadow
I used the one same as before.
Using your tube again, add the bits of it you want on your main gradient layer.
I changed the blend modes to 'Soft Light'.
Here is a preview of texture in Material Palette, and my tag so far..
6.
You can use the same ones as me, or change them up..
Ele3 - resize by 30%
Ele24 - resize by 30%
Ele30 - resize by 80%
Ele16 - resize by 70%
Ele28 - resize by 70%
Ele12 - resize by 40%
Now, add your mask.
Add the goth tree I have provided in supplies for you
Add a copyright and a name.
You are now all finished with your tag!
Written September 5, 2023.
Labels:gothic,halloween,pink,pink and spooky
Subscribe to:
Post Comments
(Atom)
-me-


great tut sylvie thanks for using our kit xxx
ReplyDeleteI love you gals kits, seriously!
DeleteWill be writing so much more with them!
♥♥
Thank you for providing them all!