Tuesday, 23 August 2022
12:45 | Edit Post
Tube - from ©Verymany - Steampunk 77 - HERE
Kit - FTU by Mizteeque called All Steamed Up - HERE
Mask - Dangerously Delicious Designs - GeoMask2 - HERE
Preset Shapes - Circle
Plugins - penta.com - Color Dot
My Supplies - (tag bottom) HERE
~~~~~~~~~~~~~~~~~~~~~~~~~~~~~~~~~~~~~~~~~~
Okay, let's get started now!
1.
File - New - New image - 750 x 750 - transparent
Open 'el 34' from the scrap kit and paste it to your canvas
Image - Rotate - Free Rotate by 90% to the left.
Open 'el 33' from then kit, paste it to the canvas and move it below the frame.
Now, open 'paper 17' from the kit.
Resize it by 68% and paste it just beneath the frame but over the rectangle layer.
Using your magic wand tool, click inside of the frame.
Selections - Modify - Expand by 15
Selections - Invert
Now make your paper layer active and hit the delete key.
Now add the round frame 'el 74' and resize it by 50%.
Place it over top of the rectangular layer and under the frame, coming out from the left.
2.
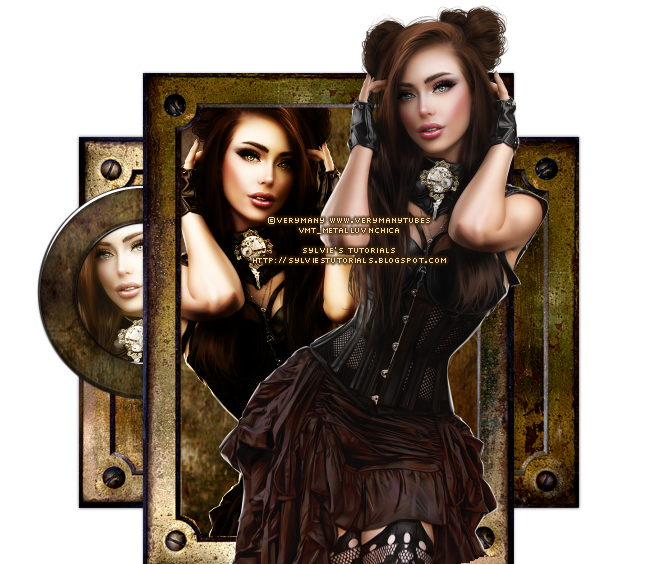
Open your tube of choice, I am using Steampunk_77 by Verymany.
Paste it to your canvas as the very top layer.
Duplicate it, and move this one below the frame layer
Image - Mirror
Move it to the left of the top tube.
Click on the paper layer to make it active.
Selections - Select All
Selections - Float
Selections - Defloat
Selections - Invert
Click on the tube under the frame layer, hit the delete key.
Selections - None.
Duplicate the tube layer under the frame
Now, with the bottom one change the blend mode to Luminance (Legacy)
Do the same with the small round frame, only change the top blend mode to Screen this time.
This is what you should have now.

3.
Elements to Add:
These are all over top of the frame layer mostly..
and at the bottom of the tag
(add a dropshadow to each layer as you go)
el 12 - resize by 25%
el 55 - resize by 30%
el 6 - resize by 60%
(el 6 and el 57 were placed over the tube in center of the tag)
Now, I duplicated el 57 and moved to the right of the tag
lower it over top of the rectangular layer that we have beneath the frame
so it's coming out from the side
el 43 - resize by 50%
el 4 - resize by 25%
el 42 - resize by 50%
And well, any other elements you'd like!
Swap some elements, shake it up and make it your own!
♥
4.
Now, I am working on coming out from behind the tag
Open el 10 and resize it by 60%.
Image - Rotate - Free Rotate by 90% to the right.
Drop this layer to the very bottom and move it coming out from the right side of the tag.
Duplicate the layer
Image - Mirror
Now, I duplicated the gear layers (el 6 and el 57)
Drop them to the bottom layer and bring them out from the top and sides.
el 62 - resize by 40%
5.
Open up el 78
Also open up your paper 17 again that we used earlier
Resize it to 68%.
Now go to your material palette and go to Patterns to find your paper.
Click on el 78 to make it active
Selections - Select All
Selections - Float
Selections - Defloat
Add a new raster layer and floodfill it with the paper.
Hide the original layer and then copy and paste it to the canvas.
Resize it by 50%.
Add it coming out from the top left corner of the tag.
Add a dropshadow.
6.
Now, open up the tag bottom you downloaded in my supplies.
Make this come out from each side of the tag at the bottom.
Now, I used my preset circle shape and added the circles to each side, and one at the top.
I added dropshadow and used penta.com (color dot, original settings) on them.
These are not necessary either, I just used them as a filler and to add some dark color .
Lastly, using any font of choice, add the word STEAMPUNK to the front on the metal piece.
Now add your mask, sparkles of choice and watermark.
We are all finished with this tag!
© sylvie's tutorials.
Written August 23, 2022.
Labels:all steamed up,gothic,steampunk
Subscribe to:
Post Comments
(Atom)
-me-


0 comments:
Post a Comment