Monday, 9 January 2023
05:23 | Edit Post
SUPPLIES NEEDED
Tube by ©Amber - Selfie - at VMArtists - HERE
Preset Shape Tool - Rectangle & Heart
Fonts Used
Courtside - HERE
2 Deco Roman DNA (for wordart)
(it won't make the hashtag, use any basic font to do that)
Wordart - if you need or want to use it
You may use this wordart with any projects, not just this tutorial
for personal use only
(just right click and save)
♥
Okay, let's get started!
File - New Image - 750 x 750 - Transparent
Paste Element 51 to the canvas
Add a dropshadow
I used 0, 0, 40, 4.00
Now paste your tube, and also add a dropshadow to it
Element 44 - resize by 60% (smaller filmstrip frame)
Move to the right bottom of the tag
Image - Rotate - Free Rotate - 90% to the right
Using your Magic Wand Tool, click inside of each small hole in the frame
(hold your shift key down and keep clicking in each hole to select them all)
Selections - Modify - Expand by 6
Now add a new raster layer and floodfill each hole with a color of choice, I used #ff67b0
Move this layer beneath the frame layer
Adjust - Add/Remove Noise - Add Noise
Random - 15% - Monochrome: Checked
Now, using Magic Wand Tool one more time, click inside the main part of the frame
Add a new raster layer, and move it beneath the frame layer
Floodfill with the same color.
Selections - Select None
2.
I used a part of the tube I am using for inside this frame.
You can do the same or use a different one, up to you!
Paste it over top of the pink floodfilled layer.
Click on the pink floodfilled layer now to make it active
Selections - Select All
Selections - Float
Selections - Defloat
Selections - Invert
Click on the tube layer now and hit your delete key to trim excess.
Selections - Select None
Duplicate the tube now
Change the blend mode of the bottom one to Luminance (Legacy)
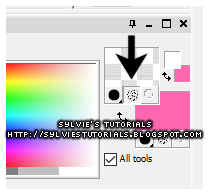
Now, add the color white in your material palette
Click the little nodule for Textures underneath the color

Click on the center of the color in the palette to open up your Material Properties
Texture nodule in properties should still be checked
Change the blend mode to Overlay
And lower the opacity to 65.
Hide all layers except the ones concerning this frame
Layers - Merge - Merge Visible
Unhide the other layers now.
Here is what we have so far:
3.
Move it to the top left of the tag and lower it beneath the main tube layer.
Now, these are the elements I have added at this point
Add a dropshadow if you would like:
Element 22 - resize by 25%
Element 16 - resize by 60%
(i duplicated it and change the blend mode of the top layer to Overlay)
Element 43 - resize by 50%
(very bottom layer and then moved it to various places around the tag)
Using your preset shape tool, rectangle
Horizontal and Vertical Radius set to 0.00
Color: #f62788
See my tag for reference of size of the rectangles
I used the Courtside font (size 27), color: black to type 'Let Me Take a Selfie'
Add a dropshadow
I also added black hearts at the beginning of the text you just added.
I also used the preset shape tool to draw pink hearts to add coming out from behind the tag.
Adjust - Add/Remove Noise - Add Noise
Random - 10% - Monochrome: Checked
Then I did the same with some smaller size black hearts and placed them over top of the pink ones
Using the same heart tool, draw some tiny hearts and place them around the outside of the tag
Now add my wordart or make your own
(font listed above and also added my wordart there if you'd rather use that)
Add your mask, some sparkles of choice
Add your copyright, and tag is finished!
Thank you so much for following along!
♥
© sylvie's tutorials.
Written January 8, 2023.
Subscribe to:
Post Comments
(Atom)
-me-


Doing this tutorial for MBM, I saved the wordart...Thank you xxx
ReplyDeleteThank you for this awesome tutorial, Hun. 💗
ReplyDeleteI'll have a tag for you in the MBM forum soon. ☺
*hugz*