Tuesday, 11 June 2024
10:21 | Edit Post
MILKSHAKE BABE
Vix Mask 147
Plugins
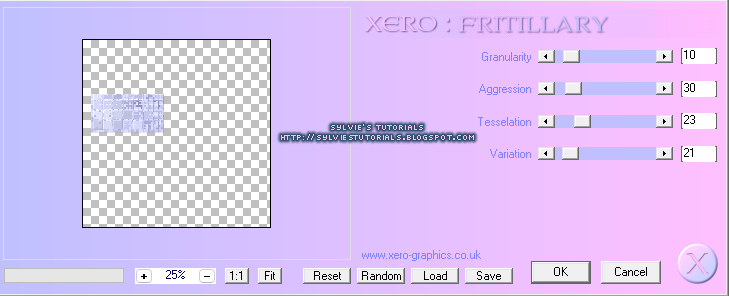
Xero - Fritillary
Eye Candy 4000 - Gradient Glow
Preset Shape Tool
rectangle
Fixed_01 (pixel font)
Butterline - (script font for wordart)
Love & Secret (script font for name)
Sparkles of choice
Okay, let's get started!
1.
New - New Image - 750 x 750 - transparent
Paste your tube of choice onto your canvas.
Choose two colors from your tube to make a gradient.
I used #6082b3 and #ff60a8
Using the font Impact - Size: 200 - Anti-Alias: Smooth
Type the word BABE using the gradient
Convert to a raster layer
Image - Rotate - Free Rotate - Right 90°
With your font layer active
Selections - All
Selections - Float
Selections - Defloat
Selections - Modify - Expand by 6
Add a new raster layer and lower it beneath the word layer
Floodfill that layer with a color of choice from your tube
Selections - Modify - Expand by 4
Add a new raster layer again and lower it beneath the one we just floodfilled
Floodfill this new layer with your previous gradient again
Selections - Select None
2.
With the very bottom gradient layer active
Adjust - Add/Remove Noise - Add Noise
Random - 17% - Monochrome: unchecked
Add a dropshadow of 0, 0, 30, 3.00
Now make the next floodfilled layer active
Effects - Texture Effects - Blinds
Width: 2
Opacity: 17
Color: white
Horizontal: checked
Add a dropshadow, same as before.
Now click on the main gradient layer to make it active.
I chose a part of my tube to add over top of each letter.
Once you get your tube parts situated where you want them, hide all other layers
Click on one of the tube parts over the letters to make it active
Layers - Merge - Merge Visible
Unhide the other layers now
Right click the layer and choose Duplicate
Click on the bottom tubes layer and change the blend mode to Luminance (Legacy)
Click on the top tubes layer and change the blend mode to Soft Light
Click on the gradient letters layer and add a dropshadow, same as before
Hide your main tube layer now
Layers - Merge - Merge Visible
Unhide your main tube layer now
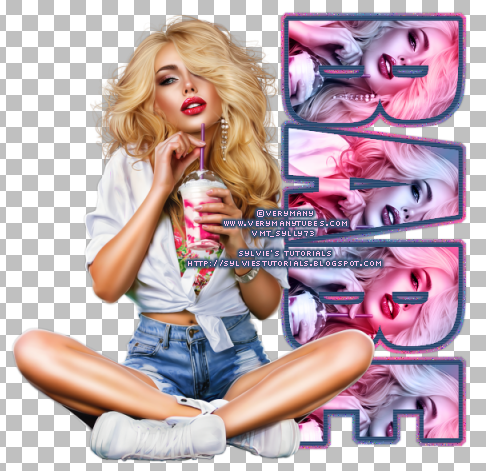
This is what I have so far:
3.
Using the color #1f4069 I drew a rectangle using rectangle preset shape tool.
I used the same pink as before #ff60a8
This is what I now have:
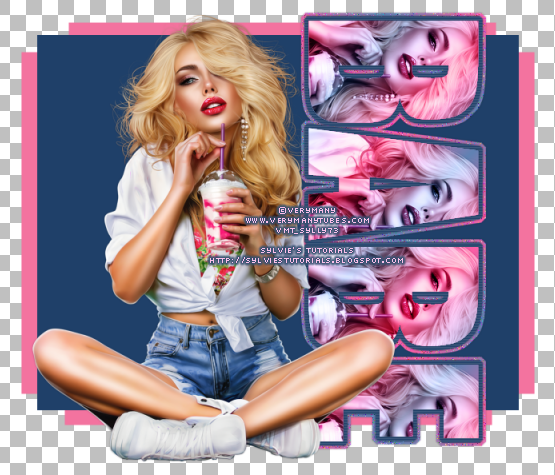
Add a dropshadow, same as before
Effects - Plugins - penta.com - Jeans - default settings
Now, use a larger version of your tube and add to the blue rectangle layer you made.
Set the color #ff60a8 in your Material Palette, in the bottom square
(the Background and Fill Properties)
Now, the top square, make it transparent by clicking the small circle with a line through it underneath.
Using the rectangle preset shape tool again

Now, draw a rectangle around the inside of your blue rectangle
Convert to raster layer
Add a dropshadow, same as before..
Here is what I have so far:
I typed the words Milkshake in a gradient using colors #d6d5fc and #fed4ec
Now, using the colors #ff60a8 and #31527b
Layers - Merge - Merge Group
Paste it onto your tag at the top right and bottom left
Using the rectangle preset shape tool once again, and the color #cbcdf5
Convert to raster layer
Add a dropshadow, same as before
6.
Using the Butterline font, type the word Milkshake
Selections - Select All
Selections - Float
Selections - Modify - Expand by 2
Add a new raster layer and lower it beneath the word Milkshake layer
Floodfill it with the color #fedcf2
Add a dropshadow 1, 1, 50, 5.00
Effects - Plugins - Eye Candy 4000 - gradient glow
I used a thin glow with the color #1f4069
Lastly, using the gradient with two colors
#ff60a8 and #1f4069
Now add your copyright information, sparkles of choice and name.
We are all finished! Woohoo!
Thank you for following along!
Written June 11, 2024.
Labels:milkshake babe,pink,sexy | 2
comments
Sunday, 18 February 2024
19:45 | Edit Post
CHOSE HERSELF
Tube ©Zindy S.D. Nielsen - available HERE
Template - Simple Circle 2 on my blog - sylly creationz - HERE
Xero - Radiance & Fritillary
penta.com - Jeans
Eye Candy 4000 - Gradient Glow
Narah Mask 0964 - HERE
Font
Pixel Font - Fixed01 - HERE
Open the template in PSP.
Shift + D to duplicate - close the original
Image - Canvas Size - 800 x 800 - Click OK
Paste the tube you want to use under the frame layer
Click on the half circle layer
Selections - Select All
Selections - Float
Selections - Defloat
Selections - Invert
Click on the tube layer to make it active, hit your delete key on the keyboard
Selections - Invert
Add a new raster layer and lower it beneath the tube layer
Selections - Select None
Duplicate the tube layer
Change the blend mode to Luminance Legacy on the bottom tube layer
And then change the blend mode to Multiply on the top tube layer
Now duplicate the top tube layer
Effects - Plugins - Xero - Radiance - default settings
2.
Selections - Select All
Selections - Float
Selections - Defloat
Add a new raster layer and floodfill with the same color as before.
Selections - Select None
Delete the white frame
Effects - Plugins - penta.com - Jeans - default settings
Effects - Plugins - Eye Candy 4000 - Gradient Glow
I added a 'thin' glow with the color #412935
3.
Using the same method as above, trim your tube using Selections
Change the blend mode of your tube to Luminance Legacy
Click on the Gray Rectangle layer, and add a dropshadow
I used 0, 0, 40, 4.00.
Image - Mirror
Click on the larger circle layer
Using same method as above once again, trim the tube
Change the blend mode to Luminance Legacy and lower the opacity to 22
Add a new raster layer and floodfill it with #412935
Selections - Modify - Expand by 8
Using the two purple colors above, I created a gradient
Floodfill this layer with the gradient and lower it beneath the floodfilled circle layer
Selections - Select None
Adjust - Add/Remove Noise - Add Noise
Random - 23% - Monochrome: Checked
Add a dropshadow of 0, 0, 40, 4.00
4.
Open your mask by Narah and resize by 86%
Paste over top of your tube layer (the one we just trimmed)
Now click on your large circle layer we just floodfilled
Selections - Select All
Selections - Float
Selections - Defloat
Selections - Invert
Click on your mask layer and hit the delete key on your keyboard
Selections - None
Change the blend mode to Overlay and lower the opacity to 40
Now ensure this mask layer is over the tube layer
Once again click on your floodfilled large circle layer to make it active
Add a dropshadow , I used 0, 0, 40, 4.00
5.
Click on the circle small layer to make it active
I changed the color to the same dark purple as before
Add a dropshadow - same as before
Xero - Fritillary - Variation: 11
Click OK.
Now paste the tube over top of this layer
I moved it to the right so it lined up with the tube under the half circle frame
Now the hair should be flowing out from behind the frame.
(see my tag for reference)
Trim excess from the tube so you can only see the hair
Duplicate the hair
Change the blend mode of the bottom layer to Luminance Legacy
Change the blend mode of the top layer to Overlay
6.
Add your Vix mask
I used the same dark purple as before
Add your credits, sparkles of choice and a name.
© sylvie's tutorials.
Written February 18, 2024.
Labels:chose herself,gothic | 3
comments
Friday, 6 October 2023
15:43 | Edit Post
Tube - ©Ismael Rac - Not available for purchase anymore
But this tube is a Creative Misfits exclusive - join Creative Misfits HERE
Scrap Kit - by Simone at Scrappy Bit of Fun - HERE
Plugins
Xero - Radiance
penta.com - Jeans
Eye Candy 4000 - Gradient Glow
Preset Shape Tool - Circle and Rectangle
(breast cancer ribbon stamp)
Fonts
Kaleenay - 'Get Your Mammogram' text
Pixelette - pixel text
Mask - Vix-Mask458
(not available for download on her website at the moment)
Will update if it is fixed!
~~~~~~~~~~~~~~~~~~~~~~~~~~~~~~~~~~
Okay, let's get started!
File - New - New Image - 750 x 750 - transparent
Grab the frame 'F-001' from the scrap kit and paste to your canvas.
No resizing is necessary
Using a gradient of choice , and preset shape tool, draw a circle and move it beneath the frame.
Convert to a raster layer
I made my own gradient using colors ##fd3395 and white.
Make sure the circle is just within the center of the frame.
Now, using circle preset shape tool again, draw another circle larger than the frame.
Convert it to a raster layer and lower it to the very bottom layer.
Now, using the color #cf4c7d, draw one more circle
Convert it to a raster layer
Adjust
Add/Remove Noise
Add Noise
Random - 38% - Monochrome: Unchecked
Add a dropshadow to this circle, the largest pink circle and the frame
I used 0, 0, 30, 3.00 for all of them.
Here is a preview of what I have so far:
2.
Add a dropshadow, I used the same as before.
Duplicate your tube, and move it to the right of your tag over the largest pink circle layer.
Duplicate it again
Now click on the largest pink circle to make it active
Selections - Select All
Selections - Float
Selections - Defloat
Selections - Invert
Click on each of your tube layers over the largest pink circle and hit your delete key
Selections - Select None
Hide all layers except the two tube layers over the circle
Click one of those two tube layers to make it active
Layers - Merge - Merge Visible
Now unhide the rest of the layers
Change the blend mode of the bottom one to Luminance (Legacy)
Change the blend mode of the top one to Screen
Using the color #cf4c7d again, draw a rectangle over the largest circle with tubes layer
and lower it to the bottom layer beneath the circle.
I drew mine with rounded corners
To do this, change the horizontal and vertical radius (at the top of PSP) to 20.00
Using the same method as above, add your tube to this shape you've just drawn on each side
Once you've done this duplicate the tubes
And then like above, change the blend modes to Luminance Legacy (bottom) and Overlay (top)
Hide all layers except the rectangle and the two tubes you've just added
Click one of the layers to make them active.
Layers - Merge - Merge Visible
Now duplicate this merged layer
Effects - Texture Effects - Blinds
Width: 2 - Opacity: 52 - Color: white
And both boxes under color are checked
Click Ok
Now lower the opacity to this layer to 50
This is what I now have:
4.
Using your Raster Deform Tool, rotate it a smidgeon to the left.
Duplicate it and then Image - Mirror so it's now on the left too
Now duplicate it, and then Image - Flip
Move it so it comes from the bottom of the tag to the right this time
Now hide all layers except these four rectangles
Layer - Merge - Merge Visible
Unhide the other layers
Selections - Select All
Selections - Float
Selections - Unfloat
Selections - Modify - Expand by 3
Selections - Select None
Adjust - Add/Remove Noise - Add Noise
Lower this layer to the very bottom
Here is what I have so far:
4.
Now, add your tube to the rotated rectangles you just made in the above step.
Place them exactly where you want them.
For me, I added the face to the top ones, but focused on the breasts for the bottom ones
They pretty much get hidden with some elements and stuff anyway..
Now, using the color #cf4c7d, draw a rectangle at the left of the tag
Lower this layer to the very bottom
Convert to a raster layer
Duplicate the layer - Image - Mirror
Add your tube using same method as above to each rectangle
Now draw a rectangle again, smaller in size and move to the bottom of the tag.
I covered the bottom part of the tube with it
Add a dropshadow again, same as before
5.
Open paper 'P-003' in PSP and resize it by 54%
Add the paper to your Material Palette
Using the paper, with the Preset Shape Tool, draw a rectangle coming out from the top of the tag.
Convert to a raster layer
Now duplicate it, and Image - Flip so it's at the bottom now too.
Now, using the same paper, make a rectangle on either side of the tag, a bit smaller than previous rectangles.
Add a dropshadow to all of these, same as before
You can also change the color of your rectangles by changing the Hue & Saturation
Here is what my tag looks like so far:
6.
Here are the elements from the kit I added:
I used the same dropshadow as above on each.
Check my tag for placement
E-005b - resize by 30%
E-007 - resize by 80%
E-004 - resize by 70%
(used the one on right side)
E-024 - resize by 25%
E-023 - resize by 40%
E-021 - resize by 40%
(used just one of the hearts)
7.
Using the rectangle preset shape tool again
Horizontal and Vertical Radius set to 0 now
Draw two small rectangles at each side of the tag, coming from behind the frame & circle layer.
Now I added a tube to the circle underneath the frame
Trim your tube and add it to each side
I used the blend mode 'Overlay'
Using your Pixelette font, type the words 'Early Detection Saves Lives'
I typed it on repeat, 3x each line and placed it over the rectangle at the very bottom of the tag
using the color #ca2461
Now, using the Kaleenay font, size 48
Type the words 'Get Your Mammogram'
Now add your watermark, some sparkles of choice and your mask!
Thank you for following along with my tutorial.
© sylvie's tutorials.
Written October 6, 2023.
Labels:bca,detection,pink | 1 comments
Tuesday, 5 September 2023
16:22 | Edit Post
Tube - ©Michi Art - available at CDO - HERE
Scrap Kit - by Tamie & Vicki - Pink & Spooky - HERE
Preset Shape Tool - Rectangle
PSP Mask by Becky - Mask016
(no longer available for download)
If you don't have it, any mask will do!
My Supplies - HERE
(contains the goth tree)
Font Used for the name: Mansfield
Creative Fabrica - HERE
File - New - New Image - 750 x 750 - transparent
Paste 'frame2' to your canvas, no resizing necessary
Add a dropshadow of 0, 0, 40, 4.00
Move it down a smidgeon on your canvas.
Add the color #ff70af to your Background and Fill Properties on your Material Palette
Using your preset shape tool, draw a pink rectangle behind the set of dots on the frame to the left
Now unhide your frame layer again.
Click on the merged layer to make it active now
Adjust - Add/Remove Noise - Add Noise
Random - 28% - Monochrome: Unchecked
2.
Now let's make a gradient to use!
Now keep the pink in your Material Palette
Add black in the Foreground & Stroke Properties of your Material Palette
Using your mouse, click on the center of one of the colors in your palette
A box should open up
Click on the gradient tab
Click the little arrow beside the picture of the current gradient
And choose 'foreground-background' in your gradient choices
It should be the two colors you have in your material palette currently
Style: Linear
Angle: 46
Repeats: 4
Click OK
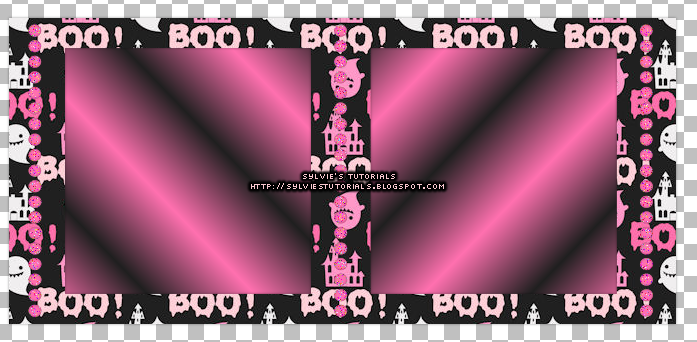
Now using your gradient, use your preset shape tool again
Draw rectangles a bit bigger than the rectangles in the frame
(or you can draw one big rectangle, up to you)
This is what you should now have:
3.
Paste your tube to your canvas.
I resized the one I am using by 85%.
Add a dropshadow to your tube, I used the same as before.
Place it exactly where you want it.
Now add your tube to the gradient rectangles in your frame.
Trim off any excess
I duplicated my tubes layer
And then changed the blend mode of the bottom layer to Luminance (Legacy)
Hide all layers except the gradient rectangles and the layered tubes over those gradients
Layers - Merge - Merge Visible
Now duplicate your merged layer
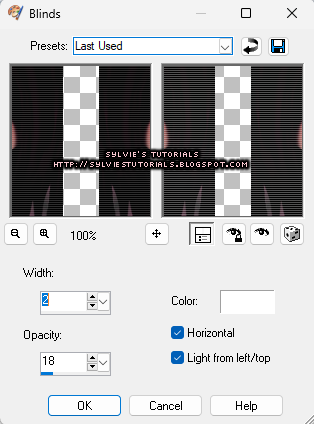
On the top one, Effects - Texture Effects - Blinds
Add these settings:
Now, lower the opacity of this layer to 65.
Unhide your other layers.
4.
Now using the same gradient, and the preset shape tool again
Convert to a raster layer.
Using your raster deform tool, rotate your rectangle a bit to the left with Deform.
Click on the gradient rotated rectangle to make sure it is active.
Selections - Select All
Selections - Float
Selections - Defloat
Selections - Modify - Expand by 7
Add a new raster layer and floodfill it with black
Selections - Modify - Expand by 3
Add a new raster layer again and floodfill it with your gradient again
Selections - Select None.
Now, move your black floodfilled layer beneath your original rotated gradient.
Move your other gradient layer beneath the black layer.
Go to Adjust - Add/Remove Noise - Add Noise
Random - 36% - Monochrome: unchecked
Now, click on your black floodfilled layer to make it active
Selections - Select All
Selections - Float
Selections - Defloat
Add a new raster layer again
Click on the pink color in your material palette to open up the properties
To the right hand side, you will see the word 'Texture'
Make sure there is a check mark in that box
Now, click the arrow beside the picture of the texture
Choose 'Grid' in your options
Angle: 0
Scale: 60
Now, floodfill the new raster layer with the grid using the color pink.
Selections - Select None
Click on your black floodfilled layer again and add a dropshadow
I used the one same as before.
Using your tube again, add the bits of it you want on your main gradient layer.
I changed the blend modes to 'Soft Light'.
Here is a preview of texture in Material Palette, and my tag so far..
6.
You can use the same ones as me, or change them up..
Ele3 - resize by 30%
Ele24 - resize by 30%
Ele30 - resize by 80%
Ele16 - resize by 70%
Ele28 - resize by 70%
Ele12 - resize by 40%
Now, add your mask.
Add the goth tree I have provided in supplies for you
Add a copyright and a name.
You are now all finished with your tag!
Written September 5, 2023.
Labels:gothic,halloween,pink,pink and spooky | 2
comments
Thursday, 17 August 2023
17:59 | Edit Post
DARK SECRETS
Tube by ©Verymany - found HERE
Scrap Kit by Tamie of Addictive Pleasures - found HERE
Mask by Dee - Dangerously Delicious Designs -
DD_FallMask_3 - no longer for download
(but any mask will do)
PSP preset shape - Rectangle
My wordart - HERE at sylly creationz
MY SUPPLIES -
Download HERE
~~~~~~~~~~~~~~~~~~~~~~~~~~~~~~~~~~~~
Okay, let's get started!
1.
Paste to your canvas, no resizing necessary
I used 0, 0, 40, 4.00
Grab a paper of choice from the kit, I used paper 8
Resize by 72% and add it to your material palette
Click on your window layer to make it active now
Using your Magic Wand Tool, click on the outside of your Window.
Selections - Select All
Selections - Float
Selections - Defloat
Selections - Modify, Contract by 5%
Adjust - Hue & Saturation - Colorize
H: 241 S: 74
2.
Grab your tube of choice.
If using the same one, I resized by 38%.
Add a dropshadow , same as before, and move the tube to the bottom of the tag.
Now add these elements:
(check my tag for placement)
leaves 3 - Resize by 50% - Paste under tube layer on each side of the tube
leaves 6 - No resizing - paste over top of the leaves layer and under the tube layer
leaves 2 - Resize by 60% - coming out from behind the gate on each side
grass 2 - Resize by 75% - paste over the window layer to the right of the tube
gargoyle - Resize by 60% - paste over the window but to the left of the tube
crow - Resize by 50% - paste to the top right of the tag
butterfly - Resize by 50% - paste to the bottom of the tag to the right side
Do the same to the butterfly and the grass you just pasted too.
3.
Now create a gradient using the colors black and #492833
Angle: 46 - Repeats: 4 - Style: Linear
Using your preset shape tool, draw a rectangle coming out from behind the right side of tag.
Make sure it's at the lowest layer.
Convert to raster layer.
Duplicate the layer and then Image - Mirror
Now you should have one on each side.
Add a part of your tube of choice over top of one of the rectangles.
Click on the rectangle layer to make it active
Selections - Float
Selections - Defloat
Selections - Invert
Now click on the tube layer and hit the delete key on your keyboard
Selections - None
Now duplicate the tube and Image - Mirror
Change the blend mode of each tube to 'Multiply'
Add a dropshadow (same as before) to the rectangle layers
4.
Now we are going to add the mask of choice.
I used one of Dee's, but if you don't have that mask, you can use any.
Her masks are no longer for download on her blog, sadly.
Grab the supplies from my download link.
Paste the 'goth tree' over top of the mask and underneath all other layers
Paste the 'weed' underneath the main tube layer on each side
Now add the copyright to your tag, add the name and we are all finished!
Thank you for following along!
Written August 17, 2023.
Labels:dark secrets,gothic | 0
comments
Tuesday, 20 June 2023
20:39 | Edit Post
PSP ADDICT
SUPPLIES NEEDED
Tube by ©Amber - VMArtists - HERE
Vix Mask 229
Preset Shape - rectangle
Plugin - penta.com
1.
File - New - New Image - 750 x 750 - transparent
Frame 3 from the scrap kit, paste to your canvas - no resizing
Add a dropshadow - I used 0, 0, 30, 3.00
Now paste your tube to your canvas, I resized by 45%
And added the very same dropshadow
Duplicate it, and then Image - Mirror so it's now on the left side too.
In your Material Palette - add these two colors to match the kit:
#353543 & #fe8fa6
Now using those colors, make your own gradient
Angle: 42 Repeats: 4
Using your magic wand tool, click on the inside of one of the round frames
Selections - Invert
Selections - Modify - Expand by 5
Floodfill with the gradient
Selections: None
Duplicate the gradient layer
Image - Mirror
Now add a dropshadow on the round frames, same as before
2.
Now, I've taken a screen shot of my laptop screen with PSP open on it.
On your computer/laptop, hit the 'prt sc' key (print screen)
In your PSP program, paste it and then draw a selection around the part you want.
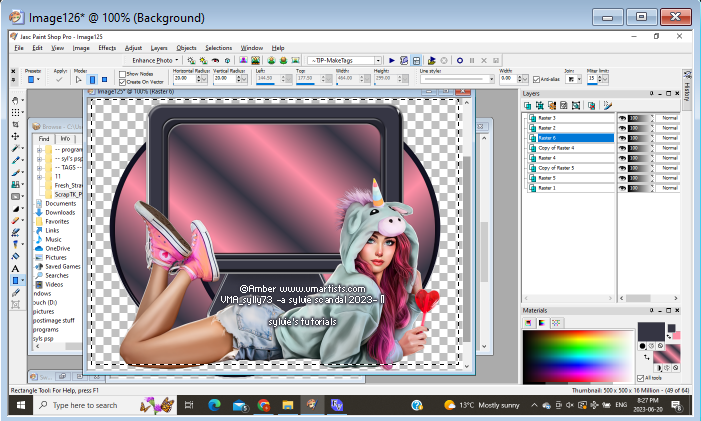
Now, paste it beneath the first frame in center of your canvas
Resize as necessary
Using your rectangle preset shape, draw a rectangle with the gradient from earlier
just so it fits that very same center frame
Duplicate the screen shot and change the blend modes
Bottom one to Luminance Legacy
Top one to Soft Light
3.
Now add a bit of the tube you would like to have in the side circle frames
(I used part of my main tube)
Paste the tube bit over the gradient in the circle
Selections - Select All
Selections - Float
Selections - Defloat
Selections - Invert
Now click on the tube layer and hit the delete key to chop excess
Selections - None
Duplicate this tube layer
Image - Mirror
Now you should have one on each side.
Duplicate each of them and change the blend modes
Bottom layers: Luminance Legacy
Top layers: Screen
Make one of your circle frames active by clicking on the layer
Selections - Modify - Expand by 4
Add a new raster layer and lower beneath the frame layer
Floodfill with the gradient again
Selections - None
Adjust - Add/Remove Noise - Add Noise
Random - 37% - Monochrome: checked
Click Ok
Now add a dropshadow, I used 0, 0, 40, 4.00
Click on the frame layer now to make it active
Effects - Plugins - penta.com - color dot - default settings
Do the same to the frame on the other side.
This is what you should have now:
4.
Now add these elements below.
See my tag for reference, or you can put your elements elsewhere on the tag
Totally up to you!
Element 2 - resize by 60%
Open wordart 2 and paste to the canvas - no resize necessary
I added a dropshadow, I used 1, 1, 50, 5.00
Image - Rotate - Free Rotate - to the right by 90%
Now, add your mask, copyright, sparkles of choice and the name.
We are FINISHED!
Written June 20, 2023.
Labels:pink,psp addict | 0
comments
Wednesday, 11 January 2023
11:56 | Edit Post
POLKA VALENTINE
SUPPLIES NEEDED
Tube © Alex Prihodko - VMArtists - HERE
FTU Scrap Kit by SimplyVicki - Smoochie Woochie - HERE
Font Used
Impact - for the wordart
Fixed_01 - for the pixel font
Fanfare - for the name
Mask - #44 by me - sylly creationz - HERE
Okay, let's get started!
1.
Open Element 51 from the kit, resize by 90% and paste to the canvas
Image - Rotate - to the Right by 90%
Make a gradient using two colors from the scrap kit now
I used #db1014 and #fb78ae
Using your Magic Wand Tool, click inside of the frame
You will see marching ants around the frame
Selections - Modify - Expand by 8
Add a new raster layer now and lower it beneath the frame layer
Floodfill with your gradient you made
Selections - Select None.
2.
Open the tube you are using now and paste it to the canvas.
Resize it so it fits within the canvas, move it over the gradient layer to the right of the frame
Now, use a close up and move it to the left and underneath the tube you just pasted on.
Click on the gradient layer
Selections - Select All
Selections - Float
Selections - Defloat
Selections - Invert
Now click on each of the tube layers and hit the delete key.
Click on the closeup, add a dropshadow (0, 0, 30, 3.00) and duplicate it
Change the blend mode of the bottom layer to Luminance (Legacy)
And change the blend mode of the top layer to Screen
Now, click on the other tube to make it active
Add a dropshadow (same as above) and then duplicate it
Change the blend mode of the bottom layer to Luminance (Legacy)
And then change the blend mode of the top layer to Overlay
Add a dropshadow to the frame layer now
Click on the gradient layer again
Effects - Texture Effects - Blinds
3.
Layers - Merge - Merge Visible
All layers should now be merged together
Duplicate your frame
Image - Rotate - Free Rotate by 10% to the right
Lower this layer beneath your main frame layer
This is what I now have:
(I used 0, 0, 40, 4.00)
4.
Now these are the elements I placed on my tag
Use my tag for reference, and add a dropshadow if you like
I used 0, 0, 30, 3.00
Element 35 - no resizing necessary
(Image - Rotate - Free Rotate - by 10% to the left)
Element 71 - resize by 60%
Element 38 - resize by 40%
Element 13 - resize by 35%
Element 53 - resize by 50%
Select the Impact font, or a font of your choice
Size: 125 - Color: #db1014
Convert to a raster layer
Image - Rotate - to the right by 90%
Move it to the right of your tag, like mine
Click on the main tube layer to make it active
Selections - Select None
Edit - Paste
Move it over top of the word XOXO
Now, make the XOXO layer active
Selections - Float
Selections - Defloat
Selections - Invert
Click on the tube layer and hit the delete key on your keyboard
Selections - Invert again
Selections - Modify - Expand by 2
Add a new raster layer and lower it beneath the XOXO layer
Floodfill it with the color #fb78ae
Selections - Select None
Adjust - Add/Remove Noise - Add Noise
Add a dropshadow of 1, 1, 50, 5.00
Now click on the tube layer over the XOXO layer again to make it active
Now click on the XOXO layer
Duplicate it
Effects - Texture Effects - Blinds
(same settings as earlier)
Now lower the opacity of this layer to 62%
Place them over top of the XOXO wordart in various places
Now using your preset shape tool
Draw a heart and add it a few random places
See my tag for reference
Adjust - Add/Remove Noise - Add Noise
Random - 8% - Monochrome: checked
You can also just save and use this heart if you wish
(Just right click and save)
Add your copyright, and tag is finished!
Thank you so much for following along!
♥
© sylvie's tutorials.
Written January 11, 2023.
Labels:pink,polka valentine,valentines | 1 comments
Subscribe to:
Comments
(Atom)
-me-
