Tuesday, 11 June 2024
10:21 | Edit Post
MILKSHAKE BABE
Vix Mask 147
Plugins
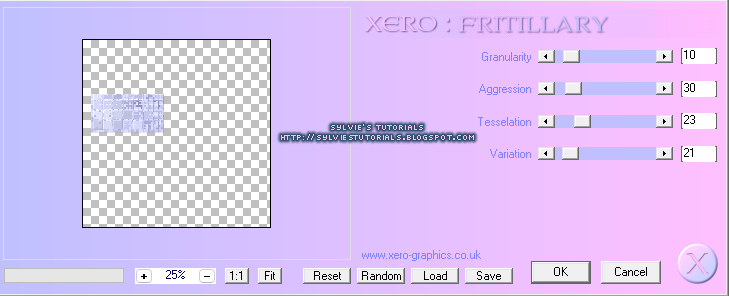
Xero - Fritillary
Eye Candy 4000 - Gradient Glow
Preset Shape Tool
rectangle
Fixed_01 (pixel font)
Butterline - (script font for wordart)
Love & Secret (script font for name)
Sparkles of choice
Okay, let's get started!
1.
New - New Image - 750 x 750 - transparent
Paste your tube of choice onto your canvas.
Choose two colors from your tube to make a gradient.
I used #6082b3 and #ff60a8
Using the font Impact - Size: 200 - Anti-Alias: Smooth
Type the word BABE using the gradient
Convert to a raster layer
Image - Rotate - Free Rotate - Right 90°
With your font layer active
Selections - All
Selections - Float
Selections - Defloat
Selections - Modify - Expand by 6
Add a new raster layer and lower it beneath the word layer
Floodfill that layer with a color of choice from your tube
Selections - Modify - Expand by 4
Add a new raster layer again and lower it beneath the one we just floodfilled
Floodfill this new layer with your previous gradient again
Selections - Select None
2.
With the very bottom gradient layer active
Adjust - Add/Remove Noise - Add Noise
Random - 17% - Monochrome: unchecked
Add a dropshadow of 0, 0, 30, 3.00
Now make the next floodfilled layer active
Effects - Texture Effects - Blinds
Width: 2
Opacity: 17
Color: white
Horizontal: checked
Add a dropshadow, same as before.
Now click on the main gradient layer to make it active.
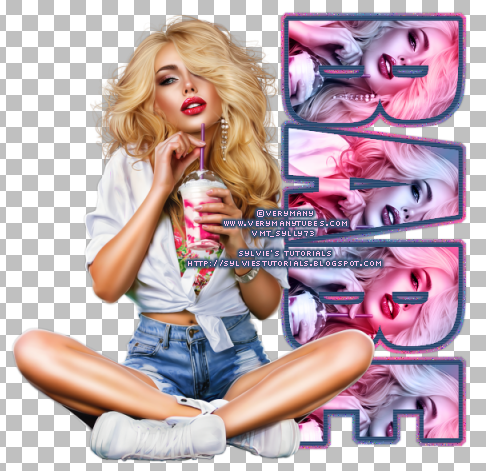
I chose a part of my tube to add over top of each letter.
Once you get your tube parts situated where you want them, hide all other layers
Click on one of the tube parts over the letters to make it active
Layers - Merge - Merge Visible
Unhide the other layers now
Right click the layer and choose Duplicate
Click on the bottom tubes layer and change the blend mode to Luminance (Legacy)
Click on the top tubes layer and change the blend mode to Soft Light
Click on the gradient letters layer and add a dropshadow, same as before
Hide your main tube layer now
Layers - Merge - Merge Visible
Unhide your main tube layer now
This is what I have so far:

3.
Using the color #1f4069 I drew a rectangle using rectangle preset shape tool.
I used the same pink as before #ff60a8
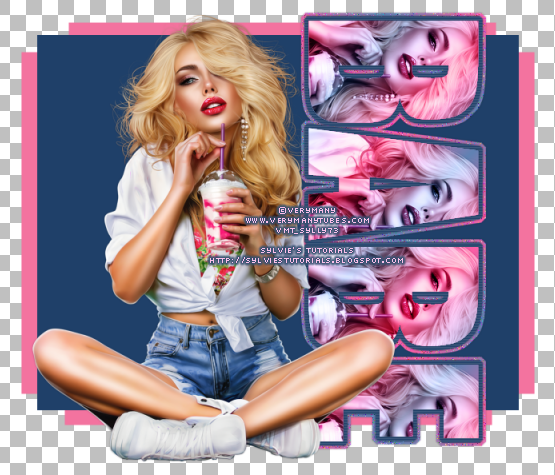
This is what I now have:

Add a dropshadow, same as before
Effects - Plugins - penta.com - Jeans - default settings
Now, use a larger version of your tube and add to the blue rectangle layer you made.
Set the color #ff60a8 in your Material Palette, in the bottom square
(the Background and Fill Properties)
Now, the top square, make it transparent by clicking the small circle with a line through it underneath.
Using the rectangle preset shape tool again

Now, draw a rectangle around the inside of your blue rectangle
Convert to raster layer
Add a dropshadow, same as before..
Here is what I have so far:
I typed the words Milkshake in a gradient using colors #d6d5fc and #fed4ec
Now, using the colors #ff60a8 and #31527b
Layers - Merge - Merge Group
Paste it onto your tag at the top right and bottom left
Using the rectangle preset shape tool once again, and the color #cbcdf5
Convert to raster layer
Add a dropshadow, same as before
6.
Using the Butterline font, type the word Milkshake
Selections - Select All
Selections - Float
Selections - Modify - Expand by 2
Add a new raster layer and lower it beneath the word Milkshake layer
Floodfill it with the color #fedcf2
Add a dropshadow 1, 1, 50, 5.00
Effects - Plugins - Eye Candy 4000 - gradient glow
I used a thin glow with the color #1f4069
Lastly, using the gradient with two colors
#ff60a8 and #1f4069
Now add your copyright information, sparkles of choice and name.
We are all finished! Woohoo!
Thank you for following along!
Written June 11, 2024.
Labels:milkshake babe,pink,sexy
Subscribe to:
Post Comments
(Atom)
-me-


Your tutorial is awesome, Sylvie. Thank you for using my mask. It's still available to download on my blog.
ReplyDeleteYesss, it's linked up there Narah! LOVE your masks ♥ Thank you for them all!! It's Vix's that are no longer available
Delete