Showing posts with label christmas. Show all posts
Showing posts with label christmas. Show all posts
Wednesday, 9 November 2022

Tube - ©Fiodorova Maria - VM Artists - HERE
Scrap Kit - Doodles by Design - Unwrap the Fun - HERE
Gradient - Tonya Temptations - I used XmasGrad_Reindeer - HERE
Plugins Used:
penta.com - Jeans & Color Dot
Xero - Radiance
Preset Shapes: rectangle & circle
Mask: by Narah (1056) - I can't find a site with her masks
Unsure that I can share it, so I won't - but any mask will do in the meantime.
~~~~~~~~~~~~~~~~~~~~~~~~~~~~~~~~~~~~~~~~~~~~~~~~
1.
File - New Image - 800 x 800 - transparent
Grab 'frame 2' from the scrap kit - resize by 75%
Paste it to the left of the tube
Duplicate it
Image - Rotate - Free Rotate to the right by 15%
Floodfill them with a color from your tube or the kit
I chose #108e3f
Add a dropshadow to both of your frames.
I used 0, 0, 40, 4.00.
Paste a part of your tube over top of your floodfilled layer for the top frame.
Trim any excess off.
Image - Mirror and place it exactly where you want it.
Duplicate the tube
Change the blend mode of the bottom tube to Luminance (Legacy)
And change the blend mode to the top tube to Hard Light
Hide all layers except the top green floodfilled layer and the tubes over it.
Layers - Merge - Merge Visible
Duplicate this merged layer
Effects - Plugins - penta.com - Jeans - default settings
Lower the opacity of the top one to 40
Duplicate the layer that you lowered the opacity on
Effects - Plugins - Xero - Radiance - default settings
And lower the opacity of this layer a smidgeon more down to 26.

2.
Add dropshadow to each of these as you go, I used 0, 0, 30, 3.00.
Now, grab the element 76 from the scrap kit, resize it by 85%
Paste it to the right of your tube, coming out from behind it
Element 39 - resize by 30% - Image - Mirror - place over the tree but under main tube.
Element 36 & 32 - Resize by 30% and place to the left of the main tube
Open up 'frame7', and before posting to your canvas, duplicate it
Change the blend mode to Overlay
Now copy and paste it to your canvas, resize by 85%
Image - Free Rotate - Rotate by 90% to the right
Move this frame to the left of the tag, coming up from your previous frames.
Using your magic wand tool, click in each of the squares of the frame
while holding down your shift key so it will select them all
Add a new raster layer - floodfill it with your gradient
Lower this layer beneath the frame
Selections - None
Now add whichever part of the tube you want to use, and trim excess.
Duplicate the tubes
Change the blend modes : Luminance (Legacy) on the bottom, Soft Light on the top.
Add a dropshadow to frame, I used 0, 0, 40, 4.00.
Once again, add dropshadow as you go. I used 0, 0, 30, 3.00 again.
And look at my tag for reference on placement of elements, or go on your own!
♥
Element 3 - resize by 15%
Element 14 - resize by 40%
Element 17 - resize by 15%
Element 29 - resize by 30%
Element 30 - resize by 40%
Element 50 - resize by 40%
Element 56 - resize by 60%
Element 64 - resize by 40%
Element 100 - resize by 40%
Element 108 - resize by 40%
Element 126 - resize by 25% ( i used this twice!)
4.
Now using the same gradient you used before
Use your preset shape tool and draw a circle
Convert to a raster layer and lower it to the very bottom layer.
(I have it coming out from the top right of the tag)
Selections - Select All
Selections - Float
Selections - Defloat
Selections - Modify - Expand by 8
Add a new raster layer and lower it beneath the gradient circle
Floodfill with the color red I used #db1a25
Selections - Modify - Expand by 3
Add a new raster layer again and lower it beneath the red layer
Floodfill with your gradient once again
Selections - None
Click on your very bottom gradient layer to make it active
Adjust - Add/Remove Noise - Add Noise
Random - 42% - Monochrome: checked
Add a dropshadow, 0, 0, 40, 4.00
Now click on the red circle layer to make it active
Effects - Plugins - penta.com - Color Dot - default settings
Now, grab a part of your main tube and paste it over top of your top gradient circle.
Trim excess and duplicate the tube
Bottom change the blend mode to Luminance (Legacy) and top one to Overlay
I also added another bit of my tube at the top of the circle and lowered the layer beneath the other two
And changed the blend mode to Luminance (Legacy) and lowered the opacity to 24%.
Add sparkles of choice, your mask and your copyright.
We are now finished our tag!
Thank you so much for following along.
♥
© sylvie's tutorials.
Written November 9, 2022.
Wednesday, 11 December 2019
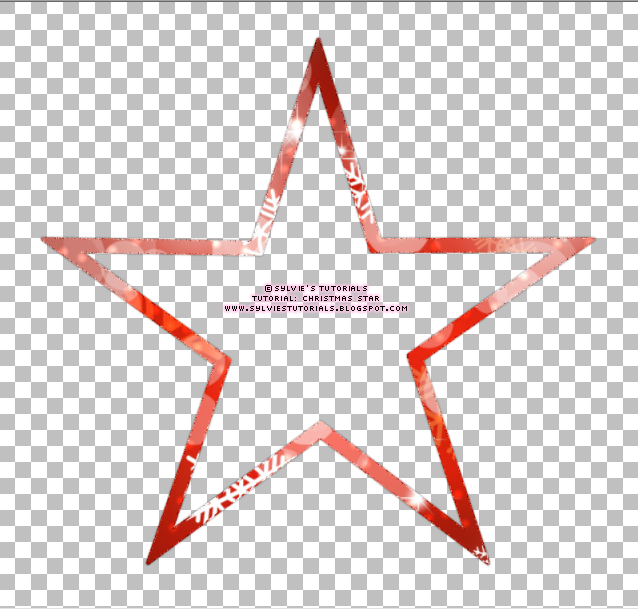
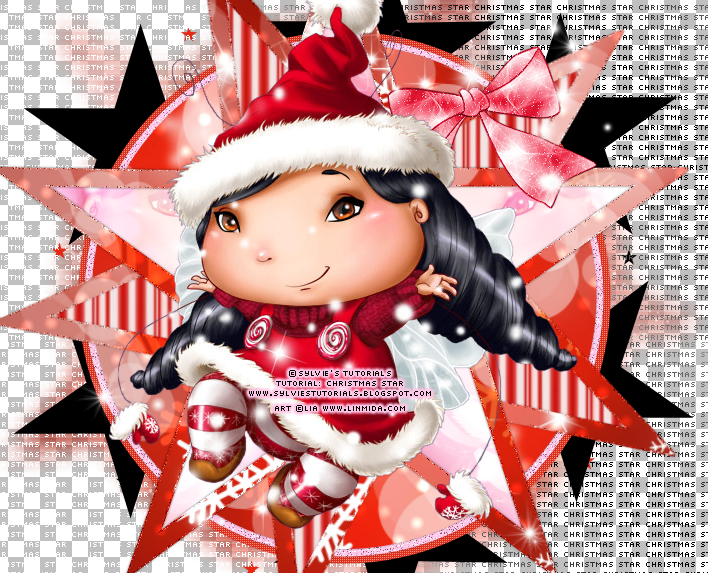
CHRISTMAS STAR

Materials Needed
Tube of choice - I used ©Lia from www.linmida.com - tube supplied, tubed by Shewolf
(Lia's art is an on site general permission) - site down so use www.deviantart.com/liaselina
Preset Shape Tool - star & circle
Plugins Used - Eye Candy 4000, VDL Adrenaline & penta.com
Plugins Used - Eye Candy 4000, VDL Adrenaline & penta.com
Two patterns of choice - The 2 I used are supplied
(just saved off the net, no site origin.. If they're yours please let me know)
Gradient of choice - I used TBT_ValBalloon by Tonya's Temptations HERE
(just saved off the net, no site origin.. If they're yours please let me know)
Gradient of choice - I used TBT_ValBalloon by Tonya's Temptations HERE
A bow of choice - Mine in supplies - tubed by JoLuvsDogs.
Sparkles of your choosing
Also used 'Fruitella' for the name, you can grab it HERE
(not sure how long it will stay free though, grab it while you can in case)
Download my Supplies HERE OR HERE
1.
Start by adding your snowflake bokeh pattern to your materials palette in 'foreground'.
Background is on the bottom, foreground is the top of your material palette, pictured below.
New Image - 750 x 750 - Transparent.
Activate your star preset shape tool.
Create on Vector: checked, Number of sides: 5, Radius: 38.00, Line Style: solid, Width: 15.00
Hide your background layer by clicking the circle with a line through it under the box
to make it transparent.

2.
Draw out a star using your added pattern.
Object - Align - Center in Canvas. Right click your layer and convert to raster layer.
Selections - All, Selections - Float, Selections - Defloat, Selections - Modify - Expand by 2
Add a new raster layer and lower it beneath the star layer you drew.
Floodfill this layer with the same pattern you used to draw the star.
Selections - Select None.
Adjust - Add/Remove Noise - Add Noise - Random - 33% - Monochrome: Checked
Add a dropshadow of 0, 0, 30, 3.00.
3.
Duplicate the merged star you just made.
With the bottom star layer active - Image - Rotate - Free Rotate - Left: 20%.
All Layers and Rotate Single Layer are both unchecked. Duplicate this one again.
Now Image - Mirror. Right click the layer of this duplicated one - Arrange - Send to Bottom.
Go to Adjust - Blur - Gaussian Blur - 12.00.
Effects - Texture Effects - Blinds - Width: 7 - Opacity: 21 - Color: White - Both boxes checked.
Now go to your Effects - Plugins - VDL Adrenaline - Snowflakes
Change 'Amount' to 127 and 'Size Range End' to 8, leave the rest as is.
This will add the snowflakes to your blurred star.
Now lower the opacity to 70.

4.

Convert them to raster layers.
Hide all of your layers except the black stars, and Merge Visible again.
Unhide all of the layers, and make sure your stars are right above the pixel text layer.
Selections - Select All, Selections - Float, Selections - Defloat, Selections - Invert
Click on your pixel text layer now and hit the delete key, to delete the excess.
Selections - None.
Now hide your 6 black stars layer.
You should now see your pixel text in the shape of the 6 black stars that were there.
8.
Using your preset shape tool again - star, draw out some tiny stars.
I drew some in red, some in black and some in white randomly over top of the blurred star layer.
Add a dropshadow of 0, 0, 20, 2.00 to them.
Using your 'Chocolate Box' font, size: 72, color: red
Type out the word 'Christmas' and lower it to bottom of the tag.
Selections - Select All, Selections - Float, Selections - Defloat, add a new raster layer
Lower it beneath the 'Christmas' text layer and floodfill it with white.
Add a dropshadow of 1, 1, 30, 3.00.
Effects - Plugins - Eye Candy 4000 - Gradient Glow - Glow Width: 3.00
Click on the 'color' tab in the Gradient Glow box and choose Medium and the color red
This will place a bit of red glow around the white back of your Christmas text to make it pop a bit.
Using the color 'black' type the words 'Star' 5 times in a row.
Lower this layer just above your blurred star, tiny stars and pixel text layers.
Add a dropshadow of 0, 0, 20, 2.00.
Add your copyright, sparkles of choice, the bow (colorized to match) and your name
Now you can call it DONE!
I used the 'Fruitella' font for the name.
♥
1.
Start by adding your snowflake bokeh pattern to your materials palette in 'foreground'.
Background is on the bottom, foreground is the top of your material palette, pictured below.
New Image - 750 x 750 - Transparent.
Activate your star preset shape tool.
Create on Vector: checked, Number of sides: 5, Radius: 38.00, Line Style: solid, Width: 15.00
Hide your background layer by clicking the circle with a line through it under the box
to make it transparent.
2.
Draw out a star using your added pattern.
Object - Align - Center in Canvas. Right click your layer and convert to raster layer.
Selections - All, Selections - Float, Selections - Defloat, Selections - Modify - Expand by 2
Add a new raster layer and lower it beneath the star layer you drew.
Floodfill this layer with the same pattern you used to draw the star.
Selections - Select None.
Adjust - Add/Remove Noise - Add Noise - Random - 33% - Monochrome: Checked
Add a dropshadow of 0, 0, 30, 3.00.
Layers - Merge - Merge Visible.
It should look like this:3.
Duplicate the merged star you just made.
With the bottom star layer active - Image - Rotate - Free Rotate - Left: 20%.
All Layers and Rotate Single Layer are both unchecked. Duplicate this one again.
Now Image - Mirror. Right click the layer of this duplicated one - Arrange - Send to Bottom.
Go to Adjust - Blur - Gaussian Blur - 12.00.
Effects - Texture Effects - Blinds - Width: 7 - Opacity: 21 - Color: White - Both boxes checked.
Now go to your Effects - Plugins - VDL Adrenaline - Snowflakes
Change 'Amount' to 127 and 'Size Range End' to 8, leave the rest as is.
This will add the snowflakes to your blurred star.
Now lower the opacity to 70.
4.
Open your candy cane pattern and put it into your material palette.
Doesn't matter if it's background or foreground for this one.
Using your magic wand, click on the center of the middle star on your canvas.
Selections - Modify - Expand by 8, add a new raster layer and lower it beneath the star.
Floodfill with your candy cane texture. Selections - None.
Hide all layers except your middle star layer and the floodfilled layer you just made.
Layers - Merge - Merge Visible. Unhide all layers again.
Now, find your gradient of choice, I used TBT_ValBalloon for mine.
With the top star frame layer, do the same process,
only floodfilling with the gradient instead of the candy cane pattern.
Make sure your gradient layer is beneath your top star layer.
Open up the tube and paste it between the gradient and top star layers.
Move the tube to the left and then duplicate it. Image - Mirror.
You should now have the tube on either side of the gradient layer.
Make your gradient layer active.
Selections - Select All, Selections - Float, Selections - Defloat, Selections - Invert
Now click on each of the tube layers and hit the delete key to delete the excess.
Change the blend mode to 'Screen' for each of these.
Hide all layers except the top star, gradient and tube layers, making one of these layers active.
Layers - Merge - Merge Visible. Unhide all the layers again.
You should now have this:
(my blurred star layer is hidden in this preview)
5.
Paste your tube on top of all current layers.
Add a dropshadow of 0, 0, 30, 3.00.
Now, above the blurred star layer, I drew a circle using the snowflake bokeh pattern.
Below that, I drew another circle using the color #ffc7e7. Add dropshadow, same as before.
Adjust - Add/Remove Noise - Add Noise - Random - 33% - Monochrome: checked.
Dropshadow again.
Lastly, I drew another circle a tad bigger beneath that one, color #dc311f. Dropshadow again.
Effects - Plugins - penta.com - color dot - original settings.
6.
If you are making your text something different from my own:
Make your own gradient with the colors black and white.
Using your pixelette font, type the words across your canvas until it is full.
If you are using 'Christmas Star' like me, you can click and save mine below.
(click on image, then right click and save)
7.
Using the color black, I drew some random stars so that they come out from beneath my circle layers, and just above the blurred star and pixel text layers.
Using the color black, I drew some random stars so that they come out from beneath my circle layers, and just above the blurred star and pixel text layers.
I drew out 6 of them, like below:
Convert them to raster layers.
Hide all of your layers except the black stars, and Merge Visible again.
Unhide all of the layers, and make sure your stars are right above the pixel text layer.
Selections - Select All, Selections - Float, Selections - Defloat, Selections - Invert
Click on your pixel text layer now and hit the delete key, to delete the excess.
Selections - None.
Now hide your 6 black stars layer.
You should now see your pixel text in the shape of the 6 black stars that were there.
8.
Using your preset shape tool again - star, draw out some tiny stars.
I drew some in red, some in black and some in white randomly over top of the blurred star layer.
Add a dropshadow of 0, 0, 20, 2.00 to them.
Using your 'Chocolate Box' font, size: 72, color: red
Type out the word 'Christmas' and lower it to bottom of the tag.
Selections - Select All, Selections - Float, Selections - Defloat, add a new raster layer
Lower it beneath the 'Christmas' text layer and floodfill it with white.
Add a dropshadow of 1, 1, 30, 3.00.
Effects - Plugins - Eye Candy 4000 - Gradient Glow - Glow Width: 3.00
Click on the 'color' tab in the Gradient Glow box and choose Medium and the color red
This will place a bit of red glow around the white back of your Christmas text to make it pop a bit.
Using the color 'black' type the words 'Star' 5 times in a row.
Lower this layer just above your blurred star, tiny stars and pixel text layers.
Add a dropshadow of 0, 0, 20, 2.00.
Add your copyright, sparkles of choice, the bow (colorized to match) and your name
Now you can call it DONE!
I used the 'Fruitella' font for the name.
♥
©sylvie's tutorials.
Written December 11, 2019.
Subscribe to:
Posts
(Atom)


