Showing posts with label cutesy. Show all posts
Showing posts with label cutesy. Show all posts
Friday, 6 January 2023

SUPPLIES NEEDED
(will post the link to mask downloads once her link is back up and running)
This is a super easy, put together tutorial!
Okay, let's get started!
1.
File - New Image - 750 x 750 - Transparent
Paste the tube you are using to the canvas, add a dropshadow
Element 37 - no resizing needed - paste to canvas and lower beneath tube layer.
Add a dropshadow. I used 0, 0, 40, 4.00
Element 26 - resize by 60%
Image - Rotate - Free Rotate by 90% to the right
Move it to the right of the tag and make it the lowest layer
Duplicate - Image - Mirror - Add a dropshadow.
Paste over the fence to the right, moving the tube to the left more.
2.
Add a dropshadow to each if you'd like.
I added one of 0, 0, 30, 3.00.
Element 19 - resize by 70%
Element 21 - resize by 60%
Element 9 - resize by 60%
Element 59 - resize by 50%
Element 33 - resize by 40%
Element 61 - resize by 60%
Element 46 - resize by 25%
3.
Now, add sparkles of choice.
Also add your mask you are using.
I used one by Vix, listed above.
Add copyright, and name on the tag.
As I said, super easy tag to put together.
We are all finished!
Thank you so much for following along!
♥
© sylvie's tutorials.
Written January 6, 2023.
MY FRIENDS

Tube by ©Suzanne Woolcott - no longer for sale, sadly
FTU Scrap Kit by Jackie's Jewels - Friends Forever - HERE
Plugins Used
Mura's Meister - Copies
Penta.com - Jeans
DSB Flux - Radial Mosaic
Eye Candy 4000 - Gradient Glow
Fonts Used
Christabelle Sans (for the wordart)
Butterline (for the name)
DL my wordart for the tag - HERE
~~~~~~~~~~~~~~~~~~~~~~~~~~~~~~~~~~~~~~~~~~~~~~~~~~~
Okay, let's get started!
1.
File - New Image - 800 x 800 - Transparent
Copy and paste your tube of choice to the canvas.
Move it right below the tube layer - I rotated the frame a smidgeon using Raster Deform Tool.
Now make your own gradient by choosing two colors you'd like to use for your tag.
I used #bac98b and #b5d7d4
Choose Foreground-background in your gradients to make your own
Using your Magic Wand Tool, click inside of your frame
Selections - Modify - Expand by 10
Add a new raster layer and floodfill with your new gradient.
Selections - None
Move that layer below your frame layer.
Duplicate your tube now and move it between the frame and gradient layer
to the left of your round gradient layer
Duplicate it - Image Mirror
Click on your gradient filled layer to make it active
Selections - Select All
Selections - Float
Selections - Defloat
Selections - Invert
Click on one of the tube layers and hit the delete key
Do the same with the other one.
Selections - None
Now duplicate these tube layers
Change the blend mode of the bottom ones to Luminance (Legacy)
And change the blend mode of the top ones to Soft Light
Now add a dropshadow to your frame
Hide your main tube layer
Layers - Merge - Merge Visible
Now unhide the main tube again.
2.
Using your preset shape tool, draw a circle the size you would like
I made mine to mostly fill my canvas
I used the same gradient as above to draw the circle
Objects - Align - Center in Canvas
Now, convert to a raster layer
Duplicate your tube layer and hide one
Also hide your frame layer we just merged
Click on the unhidden tube layer to make it active
Resize by 60%
Effects - Plugins - Mura's Meister - Copies
In the dropdown list choose Wallpaper (rotate)
I changed the number to 79 - everything else stays at default
(change the number so it fills your canvas as you desire)
Click OK.
Resize this layer by 90% so it will come away from the edges of your tag
Make sure your wallpaper layer is right above your circle layer
Click on the circle layer to make it active now
Selections - Select All
Selections - Float
Selections - Defloat
Selections - Invert
Click on the wallpaper layer and hit the delete key
Selections - None
Now unhide your other layers
This is what you should have now:

3.
Click on your gradient circle to make it active now
Selections - Select All
Selections - Float
Selections - Defloat
Selections - Modify - Expand by 15
Add a new raster layer and floodfill with a color of choice
Selections - Modify - Expand by 4
Floodfill with your gradient again and move this beneath the green layer
Selections - None
Click on your very bottom gradient layer to make it active
Adjust - Add/Remove Noise - Add Noise
Random - 37% - Monochrome: checked
Now add a dropshadow to this layer - I used 0, 0, 40, 4.00
Click on the green floodfilled layer to make it active now.
Effects - Plugins - penta.com - Jeans - default settings
Now add your dropshadow again.
Click on the rotated background layer now, and add the same dropshadow.
4.
Grab Element 1 (the rectangular frame) and paste it to the canvas
Pull it to the right so it's only coming out from the right side and not seen on the left
Duplicate it, Image - Mirror
Hide all layers except the 2 rectangular frames
Make sure this layer is beneath the round frame but above the rotated wallpaper layer.
Using your Magic Wand Tool, click inside the rectangular frame at one end
Hold down your shift key and then click inside the frame at the other end
They should both have marching ants now
Selections - Modify - Expand by 5
Add a new raster layer and floodfill with a color of choice
Duplicate your main tube now
And I used the teddy bear part in this frame using the same method as above
Trim any excess of the tube and then duplicate them
Change the blend mode to Luminance (Legacy) for the bottom
And change the blend mode to Soft Light for the top.
Hide all layers except the blue floodfilled layers and the teddybear tube
Layers - Merge - Merge Visible
Effects - Texture Effects - Blinds

5.
Now these are the elements we're going to add.
Add a dropshadow to each if you like as you go.
Element 37 - no resizing necessary
(rotate by 90% to the right)
(Adjust - Hue & Saturation - Colorize - Hue: 146 - Saturation: 100)
Element 8 - resize by 50%
Element 39 - resize by 60%
Element 48 - resize by 70%
(rotate it a smidgeon using raster deform tool)
Element 30 - resize by 70%
6.
Draw a circle slightly larger than the last using a color of choice
I used #91caf5
Effects - Plugins - DSB Flux - Radial Mosaic - default settings
Lower the opacity of this layer to 50
Make a wordart for your tag, or you can add mine
(included in supplies above)
Now, add your copyright and name.
We are all finished!
Thank you so much for following along!
♥
© sylvie's tutorials.
Written January 6, 2023.
Monday, 22 August 2022
FLEUR

Tube - Lua by Alicia Mujica - HERE
Scrap Kit - FTU - Love Is In The Air by Bits n' Bobs - HERE
Gradient - TBT_XmasFurryFun - by Tonya's Temptations - HERE
(miss you so much my friend)
Preset Shape - Rectangle
Masks - by Dangerously Delicious Designs - HERE and HERE
(I used DD_Mask11 & DD_AssortedMask_1)
Fonts Used: Angelic Serif HERE
My Supplies: HERE
~~~~~~~~~~~~~~~~~~~~~~~~~~~~~~~~~~
Okay, let's get started!
1.
New canvas - 750 x 750 - Transparent
Paste the frame 'E9' onto the canvas
Now grab the element 'E39' and paste it onto the canvas.
Pull the layer down below the frame, and move it up some..
(so it comes up higher from the frame than it originally was when centered)
Duplicate this layer
Image - Flip
You should now have something that looks like this.

Using your Selection Tool, draw a rectangle around the top part of the frame

Now, click on the layer that is more at the bottom.
Hit the delete key.
Now, do the same for the upper frame..
Draw using the selection tool again, but the bottom part of the frame and underneath.
Click on the layer that is more at the top.
And hit the delete key.
This is what you should now have.

3.
Paste your tube onto your canvas.
Add a dropshadow of choice.
Choose a gradient and draw a rectangle using it a bit smaller than the frame.
Move it beneath your frame layer, but over top of the leaves and flowers layer.
Take a part of your tube and paste it over the gradient layer.
I added the face, then duplicated it.
Image - Mirror.
Hide all layers except your face layers.
Click on one of the two layers to make it active.
Layers - Merge - Merge Visible.
Unhide your layers again.
Duplicate the merged layer.
The top one, change it to 'Overlay'.
Now hide your tube, frame and leaves and flowers.
Click on the gradient to make it active.
Layers - Merge - Merge Visible.
Unhide the other layers.
Effects - Texture Effects - Blinds

4.
Click on your frame layer, and add a dropshadow.
Open element 'E55' and resize it by 25%.
Paste it to the bottom corner of the frame, just beneath the pink flower.
(see my tag for reference)
5.
If you haven't already, merge your two flower and leaf layers now.
Using your magic wand tool, click inside of the frame so the marching ants are only inside the frame.
Selections - Select All
Selections - Modify - Expand by 3
Add a new raster layer
Floodfill with the same gradient you chose to use before.
Duplicate the tube layer.
Now, add your tube just above that gradient layer.
I used the full version of the tube this time.
Move it to the left of the tube and then duplicate it
Image - Mirror
Now click on the gradient layer.
Selections - Select All
Selections - Float
Selections - Defloat
Selections - Invert
Click on your tube layer and hit delete key
Now click on the other tube layer and click delete again.
Your tubes should now be within that frame.
Duplicate them and change the blend modes
Bottom - Luminance (Legacy)
Top - Screen
Then lower the opacity of the lower ones to 54.
6.
Now, grab element 'E1' from the kit and paste it over the frame and behind the tube.
Grab the supplies from my link above.
Resize the 'md-prettyflowers' to 70% and paste it under the tube over the middle part of the frame.
Open the 'shasta daisies' and i used the left daisy on the bottom row.
Paste it to the left of your frame and then once over top to the right.
7.
Now it's time to open add your mask.
Add your sparkles of choice and watermark.
You are now finished with the tag!
Thank you so much for trying my tutorial.
♥
© sylvie's tutorials.
Written August 22, 2022.
Sunday, 13 March 2022
CUTEST CLOVER

Tube - Art by ©Kajenna - Available at PicsForDesign HERE
Scrap Kit by Wicked Diabla - Lucky Clover - Available HERE
Template by Me - Available on Creative Misfits blog HERE
Mask by Me - Mask 046 - Available on Creative Misfits blog HERE
Textures by GrimAna - provided in Creative Misfits forum
You can use any texture or paper in it's place if you don't have them.
Plugins
Xero - Fritillary
Penta.com - Color Dot & Jeans
Eye Candy 4000 - Gradient Glow
Fonts
Fixed_01 (pixel text)
Vanilla Mermaid - name on the tag
~~~~~~~~~~~~~~~~~~~~~~~~~
Okay, let's get started!
1.
Open up the template, delete the watermark.
Shift + D to duplicate it, close out the original.
Open your paper or texture of choice.
I used a texture by Ana, you can use any paper or texture of choice here.
Click on the layer '4 circles - green'.
Add your paper/texture of choice by using the method below.
Selections - Select All
Selections - Float
Selections - Defloat
Add a new raster layer and paste the texture/paper here.
Selections - None.
Hide the original template layer.
Now, using the same method, add a gradient layer.
And then open your tube, and use that same method one more time.
Ensure your tube is the very top layer, then the texture and then the gradient at the bottom.
Change the texture layer blend mode to 'overlay'.
Duplicate the tube layer.
Change the bottom tube layer to 'Luminance Legacy'
Change the top tube layer to 'Soft Light'.
I hid all layers, except the tube, gradient and texture layers..
Make them active and then Layers - Merge - Merge Visible.
Add drop shadow .
Click on layer '4 circles light green'..
I changed the color to a darker green to match the tube.
Effects - penta.com - Color Dot - default settings.
Add a drop shadow.
Unhide your layer '4 circles - gradient'.
Add drop shadow.
Effects - Texture Effects - Blinds
Width: 3 Opacity: 43 Color: White Horizontal: Checked
Now, Merge visible all of these layers.
3.
I grabbed the 2nd texture by Ana - and pasted it over the 'circle green' layer.
Duplicate the paper or texture you use.
On the bottom layer, I chose the blend mode 'Hue'
And the one over top of it, I choose 'Screen'.
Click on the 'circle green' layer again.
Selections - Select All
Selections - Float
Selections - Defloat
Selections - Invert
Click on both of the paper/texture layers again and hit the delete key on both.
Selections - None.
4.
Click on 'text - circular'
If not, change the color and then add a drop shadow.
Duplicate your tube and lower this one just above the large shamrock layer.
Use the selections method above to cut the tube to the shape of the shamrock.
Change the blend mode to 'Overlay'.
Now, click on the 'large shamrock' layer
Selections - Select All
Selections - Float
Selections - Defloat
Selections - Modify - Expand by 2
Add a new raster layer and lower it beneath the large shamrock.
Floodfill with a gradient of choice.
Selections - None.
Add noise, add drop shadow and then add drop shadow to your large shamrock layer too.
5.
Click on the 'yellow back' layer.
Effects - Plugins - Xero - Fritillary
Change the variation to 15, click OK.
Add drop shadow.
Click on the 'green square' layer.
Effects - Plugins - penta.com - Jeans - default settings.
Add drop shadow.
Click on 'dark green back' , add drop shadow.
Click on '4 light shamrocks' layer.
Add Noise to it
Random - 16% - Monochrome: checked
Add drop shadow.
Click on '4 dark shamrocks' and add drop shadow.
6.
I also added some noise to the larger text, same as above.
Using the 'Fixed_01' pixel, I added the words 'clover' to the green circle backs.
Add dropshadow to those circle backs also.
Now, using your kit, add some bits and pieces of your choosing.
You can use my tag for reference, or go on your own.
Add your masks, I used 2 different colors with the same mask 046.
Add your watermark , and the name.
Your tag is now finished!
Thank you for trying my tutorial.
♥
©sylvie's tutorials.
Written March 13th, 2022.
I made a full 3 piece set, so sharing the other 2 parts here.


Monday, 21 June 2021
NECKTIE

Materials Needed
Tube of choice: I used Laguna - Christmas_deer_yorkie at PFD HERE
Kit of choice: I used kits by PinkParadox Productions (Blue & Gold and Princess Pooch)
Preset Shape Tool: Rectangle shape and Circle shape (comes with PSP)
Plugins: Penta.com (colordot), Mura's Meister (copies) and Xero (radiance)
Fonts Used
Impact (for the large word) - behind the cute poochie
2 Peas Fat Frog (for the circular text
MA Sexy - super cute script! (for the name)
Fixed_01 (pixel font)
*♥*♥*♥*♥*♥*♥*♥*♥*♥*♥*♥*♥*♥*♥*♥*♥*♥*♥*♥*♥*
Now let's get started!
1.
New Image - 750 x 750.
Copy and paste your tube of choice onto your canvas.
Resize to your liking, if necessary.
2.
Let's start by activating your circle preset shape tool.
Create on vector
Line style: solid
Width: 36.00
Anti-Alias: checked
Color: #011b64
On your material palette, make sure the color is in the 'Foreground & Stroke Properties'
And then make the 'Background and Fill Properties' transparent.
Draw out a circle, that takes up a good part of your canvas.
Objects - Align - Center in canvas.
Right click and covert to a raster layer in the layer palette.
Using your magic wand, click the inside of your circle.
Selections - Modify - Expand by 5
Add a new layer to your layer palette and flood fill it with the color white.
Selections - Contract by 12
Selections - Select None.
Move the white layer beneath the blue layer.
Texture Effects - Blinds
Width: 2, Opacity: 36, Color: same as above
Horizontal and Light from left/top: checked
Add a dropshadow of 0, 0, 50, 5.00, Color: Black
3.
Now, using the color #516cb8, draw a circle a tad bigger than the big blue one.
Lower it beneath the other layers.
Texture Effects - Blinds
Use the same settings as before, except the color white in the box instead of blue.
Add the same dropshadow as before to this layer, and then the dark blue circle layer.
Hide your tube layer and then:
Layers - Merge - Merge Visible.
(What you should have now is pictured in the preview below)

4.
Using a gradient of choice, I used one of Tonya's fab gradients, and miss her dearly..
Draw a circle and move it below the other layer. Covert to raster layer.
Unhide your tube layer, and resize it to a smaller size.
I resized mine by 50%, but depends on what size your main tube is.
Effects - Plugins - Mura's Meister - Copies
Choose Wallpaper (rotate) in the list
Change the Number to 150 (top one) and leave all others as is.
Click OK.
Now you should have a wallpaper layer of your tube, don't panic!
Click on your gradient layer to make it active.
Selections - All, Selections - Float, Selections - Defloat, Selections - Invert
And now hit delete on your wallpaper layer above the gradient layer.
Selections - Select None.
Duplicate the wallpaper layer.
Click on the bottom wallpaper layer to make it active, Blend Mode: Luminance Legacy
Click on the top wallpaper layer to make it active. Blend Mode: Screen
Duplicate the Screen wallpaper layer.
Xero - Radiance - default settings.

5.
Using the preset shape tool, and the darker blue color above #011b64
Draw a rectangle directly above the wallpaper layers and underneath the circle layers.
Selections - All, Selections - Float, Selections - Defloat
Selections - Modify - Expand by 3.00
Add a new layer and lower it beneath the blue rectangle layer.
Floodfill with the gradient you used before, or a different one, up to you!
Adjust - Add/Remove Noise - Add Noise - Random 46%, Monochrome: checked
Add a dropshadow, same as before.
Click on your Luminance Legacy wallpaper layer and duplicate it.
Move it above your dark blue rectangle layer.
Click on the dark blue rectangle layer.
Selections - All, Selections - Float, Selections - Defloat, Selections - Invert
Click on the wallpaper layer and hit the delete key.
Lower the opacity to 16.
With the 'Impact' font, size 95 and color: white
Type the word 'DROOLER' over all layers.
Lower the opacity to 12.
Now using the pixel font 'fixed_01', type the words 'Droolers Anonymous' across the top & bottom of rectangle.
Lower the opacity to 38.
Preset shape tool, Rectangle Line Style: diamond, width: 2.00
Draw a rectangle using the color white to make the dotted lines at the top and bottom.
You need to make sure the white is at the top, and the bottom of material palette is transparent again, like before.
Lower the opacity to 50.

6.
We are almost finished!
Using the 2Peas Fat Frog font, make your circular text around the circle ' Droolers Anonymous'
I have a tutorial for circular text if you need it HERE
Using bits and pieces from your kit of choice, add some elements where you want them to finish the tag up.
Use an element or mask on your tag, add a watermark and a name and voila!
I also, of course, add some sparkle cause I'm a sparkle loving girl!
WE ARE FINISHED!
Woohoooo, thank you for following my tutorial.
©sylvie's tutorials
Written June 21, 2021.
Wednesday, 20 May 2020
Prince Charm

I made this into a 3 piece forum set.
This tutorial is for the main tag only, though.
You can see the other 2 pieces at the bottom of this tutorial.
♥
This tutorial is for the main tag only, though.
You can see the other 2 pieces at the bottom of this tutorial.
♥
Materials Needed:
Tube - Prince Charm by Vi Nina HERE
PTU Scrap Kit - by Kizzed by Kelz - called Prince Charm HERE
Gradient - Tonya's Temptations - Spring 20_12 HERE
Plugins - Mura's Meister - Copies
Fonts Used:
KG Eyes Wide Open - (for the name)
KG Eyes Wide Open - (for the name)
My supplies: (wordart i made) - download HERE
*♥*♥*♥*♥*♥*♥*♥*♥*♥*♥*♥*♥*♥*♥*♥*♥*♥*♥*♥*♥*
Now let's get started!


1.
New image - 750 x 750.
Paste your tube of choice onto your canvas. I used frog-1 of Prince Charm.
If using the same one, resize by 40%, and add a dropshadow.
2.
Open element 121, resize by 80% and paste to the right side of the tag, behind tube.
Element 101 - resize by 80% and again paste to right, right in front of grass.
Element 54 - paste it down at the bottom of grassy bits, moving it out to overlap a bit.
Element 24 - paste it over top of the grass down low again. I added a slight dropshadow to it.
Element 14 - resize by 35% and paste down in at the bottom of grassy bits next to the frog.
Here is an image of what I have so far:

When you are happy with what you have, hide the tube layer and merge the rest together.
Duplicate the merged layer and Image - Mirror.
Element 2 - paste it right behind the frog, lowering it level with other grassy bits.
I moved it behind some of the lower front grass and flower.
Now I shifted the frog a bit to the right to see the flower and butterfly behind it.
Element 6 (lilypad) - No resize.
Paste it and lower it to the lowest layer, coming out from bottom of the tag.
Duplicate - Image- Mirror.
3.
Element 38 - resize by 50%. (leave it right in the center of the canvas)
Effects - Plugins - MuRa's Meister - Copies
Select 'Encircle' in the list - change the 'Number' to 7. Don't touch other numbers. Click OK.
Move this behind the 2 frames.
Element 41 - Image - Flip
(we are flipping it just to prevent the branch from sticking out of the outer edges)
(we are flipping it just to prevent the branch from sticking out of the outer edges)
Effects - Plugins - MuRa's Meister - Copies - same settings
Move it behind all layers.
Element 109 - resize by 25%. I placed it in 3 places to the right of tag behind frames and flowers.
Also, added one at the very top. Just wanted to add some splashes of yellow in there.
4.
Now paste these random elements to your tag from the scrap kit:
With each of these elements - duplicate them and Image - Mirror to add to the other side.
Element 9, resize by 50%. paste to the right, coming out from behind the grass, etc
Element 85 - resize by 30%. Move it behind all other layers again coming out from top.
Element 40 - resize by 60%. Move it the very lowest layer so it's coming up from behind grass.
In your material palette, make or add your gradient of choice.
I am using one of Tonya's, listed above.
Using your square preset shape tool, draw a square and move it beneath a frame.
Right click the layer and 'convert to raster layer'.
Duplicate it. Image - Mirror.
Duplicate your tube, and place it over the gradient layer under the frame on one side.
Duplicate the layer. Image - Mirror.
Duplicate the tube layers again and change bottom to Luminance (Legacy) and top to Screen.
5.
These elements I did not duplicate and mirror:
Element 42 - resize by 60%. Move it to the right of the frog coming out from behind it.
Element 4 - resize by 20%. Add to the front of the tag, next to the frog to the right.
Element 17 - resize by 30%. Paste it at the top left of the tag over the flowers.
Element 112 - resize by 30%. Paste it on the left hand side of tag, very front, bottom.
Element 13 - resize by 40%. Paste center and coming up behind the frames.
6.
Now, open the supply file I provided above, and grab the circular wordart I made.
Or you can make one of your own.
I made the wordart so you can use the white back and shadow, or remove them.
Your choice.
Once you've pasted it on, use your preset shape tool to add a small heart between words at the top.
It's just to fill in that space a bit. I used a different shade of green from the tag.
It's just to fill in that space a bit. I used a different shade of green from the tag.
7.
Now you can add your masks.
I used 2 of my own from my blog, listed above.
Add sparkles if you desire. I used some from the kit and some of my own.
Add your copyright and add your name.
We are all finished!
Thank you sooooo much for trying out my tutorial.
♥♥♥
©sylvie's tutorials.
Written May 20, 2020.


Wednesday, 11 December 2019
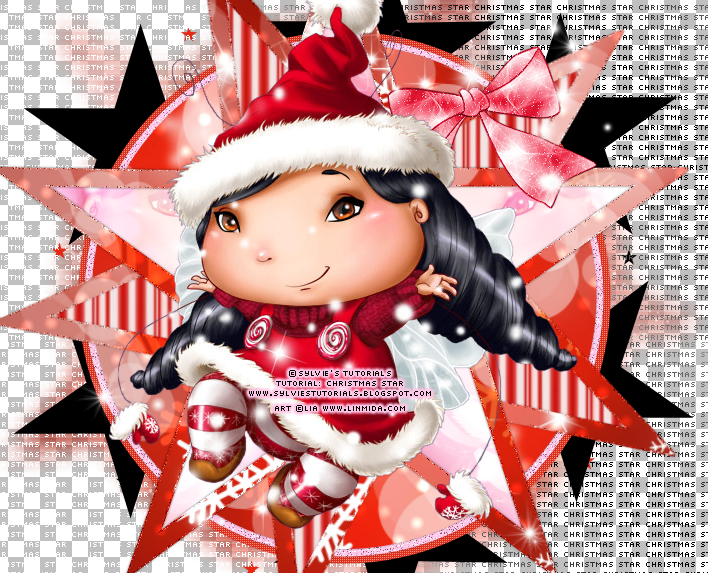
CHRISTMAS STAR

Materials Needed
Tube of choice - I used ©Lia from www.linmida.com - tube supplied, tubed by Shewolf
(Lia's art is an on site general permission) - site down so use www.deviantart.com/liaselina
Preset Shape Tool - star & circle
Plugins Used - Eye Candy 4000, VDL Adrenaline & penta.com
Plugins Used - Eye Candy 4000, VDL Adrenaline & penta.com
Two patterns of choice - The 2 I used are supplied
(just saved off the net, no site origin.. If they're yours please let me know)
Gradient of choice - I used TBT_ValBalloon by Tonya's Temptations HERE
(just saved off the net, no site origin.. If they're yours please let me know)
Gradient of choice - I used TBT_ValBalloon by Tonya's Temptations HERE
A bow of choice - Mine in supplies - tubed by JoLuvsDogs.
Sparkles of your choosing
Also used 'Fruitella' for the name, you can grab it HERE
(not sure how long it will stay free though, grab it while you can in case)
Download my Supplies HERE OR HERE
1.
Start by adding your snowflake bokeh pattern to your materials palette in 'foreground'.
Background is on the bottom, foreground is the top of your material palette, pictured below.
New Image - 750 x 750 - Transparent.
Activate your star preset shape tool.
Create on Vector: checked, Number of sides: 5, Radius: 38.00, Line Style: solid, Width: 15.00
Hide your background layer by clicking the circle with a line through it under the box
to make it transparent.

2.
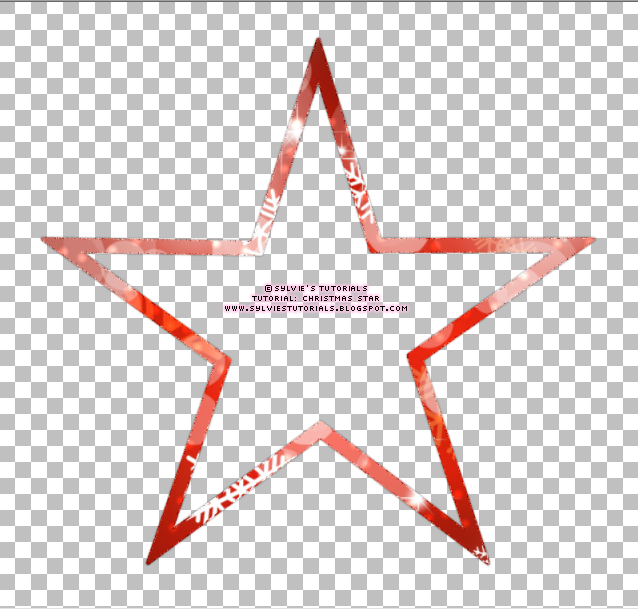
Draw out a star using your added pattern.
Object - Align - Center in Canvas. Right click your layer and convert to raster layer.
Selections - All, Selections - Float, Selections - Defloat, Selections - Modify - Expand by 2
Add a new raster layer and lower it beneath the star layer you drew.
Floodfill this layer with the same pattern you used to draw the star.
Selections - Select None.
Adjust - Add/Remove Noise - Add Noise - Random - 33% - Monochrome: Checked
Add a dropshadow of 0, 0, 30, 3.00.
3.
Duplicate the merged star you just made.
With the bottom star layer active - Image - Rotate - Free Rotate - Left: 20%.
All Layers and Rotate Single Layer are both unchecked. Duplicate this one again.
Now Image - Mirror. Right click the layer of this duplicated one - Arrange - Send to Bottom.
Go to Adjust - Blur - Gaussian Blur - 12.00.
Effects - Texture Effects - Blinds - Width: 7 - Opacity: 21 - Color: White - Both boxes checked.
Now go to your Effects - Plugins - VDL Adrenaline - Snowflakes
Change 'Amount' to 127 and 'Size Range End' to 8, leave the rest as is.
This will add the snowflakes to your blurred star.
Now lower the opacity to 70.

4.

Convert them to raster layers.
Hide all of your layers except the black stars, and Merge Visible again.
Unhide all of the layers, and make sure your stars are right above the pixel text layer.
Selections - Select All, Selections - Float, Selections - Defloat, Selections - Invert
Click on your pixel text layer now and hit the delete key, to delete the excess.
Selections - None.
Now hide your 6 black stars layer.
You should now see your pixel text in the shape of the 6 black stars that were there.
8.
Using your preset shape tool again - star, draw out some tiny stars.
I drew some in red, some in black and some in white randomly over top of the blurred star layer.
Add a dropshadow of 0, 0, 20, 2.00 to them.
Using your 'Chocolate Box' font, size: 72, color: red
Type out the word 'Christmas' and lower it to bottom of the tag.
Selections - Select All, Selections - Float, Selections - Defloat, add a new raster layer
Lower it beneath the 'Christmas' text layer and floodfill it with white.
Add a dropshadow of 1, 1, 30, 3.00.
Effects - Plugins - Eye Candy 4000 - Gradient Glow - Glow Width: 3.00
Click on the 'color' tab in the Gradient Glow box and choose Medium and the color red
This will place a bit of red glow around the white back of your Christmas text to make it pop a bit.
Using the color 'black' type the words 'Star' 5 times in a row.
Lower this layer just above your blurred star, tiny stars and pixel text layers.
Add a dropshadow of 0, 0, 20, 2.00.
Add your copyright, sparkles of choice, the bow (colorized to match) and your name
Now you can call it DONE!
I used the 'Fruitella' font for the name.
♥
1.
Start by adding your snowflake bokeh pattern to your materials palette in 'foreground'.
Background is on the bottom, foreground is the top of your material palette, pictured below.
New Image - 750 x 750 - Transparent.
Activate your star preset shape tool.
Create on Vector: checked, Number of sides: 5, Radius: 38.00, Line Style: solid, Width: 15.00
Hide your background layer by clicking the circle with a line through it under the box
to make it transparent.
2.
Draw out a star using your added pattern.
Object - Align - Center in Canvas. Right click your layer and convert to raster layer.
Selections - All, Selections - Float, Selections - Defloat, Selections - Modify - Expand by 2
Add a new raster layer and lower it beneath the star layer you drew.
Floodfill this layer with the same pattern you used to draw the star.
Selections - Select None.
Adjust - Add/Remove Noise - Add Noise - Random - 33% - Monochrome: Checked
Add a dropshadow of 0, 0, 30, 3.00.
Layers - Merge - Merge Visible.
It should look like this:3.
Duplicate the merged star you just made.
With the bottom star layer active - Image - Rotate - Free Rotate - Left: 20%.
All Layers and Rotate Single Layer are both unchecked. Duplicate this one again.
Now Image - Mirror. Right click the layer of this duplicated one - Arrange - Send to Bottom.
Go to Adjust - Blur - Gaussian Blur - 12.00.
Effects - Texture Effects - Blinds - Width: 7 - Opacity: 21 - Color: White - Both boxes checked.
Now go to your Effects - Plugins - VDL Adrenaline - Snowflakes
Change 'Amount' to 127 and 'Size Range End' to 8, leave the rest as is.
This will add the snowflakes to your blurred star.
Now lower the opacity to 70.
4.
Open your candy cane pattern and put it into your material palette.
Doesn't matter if it's background or foreground for this one.
Using your magic wand, click on the center of the middle star on your canvas.
Selections - Modify - Expand by 8, add a new raster layer and lower it beneath the star.
Floodfill with your candy cane texture. Selections - None.
Hide all layers except your middle star layer and the floodfilled layer you just made.
Layers - Merge - Merge Visible. Unhide all layers again.
Now, find your gradient of choice, I used TBT_ValBalloon for mine.
With the top star frame layer, do the same process,
only floodfilling with the gradient instead of the candy cane pattern.
Make sure your gradient layer is beneath your top star layer.
Open up the tube and paste it between the gradient and top star layers.
Move the tube to the left and then duplicate it. Image - Mirror.
You should now have the tube on either side of the gradient layer.
Make your gradient layer active.
Selections - Select All, Selections - Float, Selections - Defloat, Selections - Invert
Now click on each of the tube layers and hit the delete key to delete the excess.
Change the blend mode to 'Screen' for each of these.
Hide all layers except the top star, gradient and tube layers, making one of these layers active.
Layers - Merge - Merge Visible. Unhide all the layers again.
You should now have this:
(my blurred star layer is hidden in this preview)
5.
Paste your tube on top of all current layers.
Add a dropshadow of 0, 0, 30, 3.00.
Now, above the blurred star layer, I drew a circle using the snowflake bokeh pattern.
Below that, I drew another circle using the color #ffc7e7. Add dropshadow, same as before.
Adjust - Add/Remove Noise - Add Noise - Random - 33% - Monochrome: checked.
Dropshadow again.
Lastly, I drew another circle a tad bigger beneath that one, color #dc311f. Dropshadow again.
Effects - Plugins - penta.com - color dot - original settings.
6.
If you are making your text something different from my own:
Make your own gradient with the colors black and white.
Using your pixelette font, type the words across your canvas until it is full.
If you are using 'Christmas Star' like me, you can click and save mine below.
(click on image, then right click and save)
7.
Using the color black, I drew some random stars so that they come out from beneath my circle layers, and just above the blurred star and pixel text layers.
Using the color black, I drew some random stars so that they come out from beneath my circle layers, and just above the blurred star and pixel text layers.
I drew out 6 of them, like below:
Convert them to raster layers.
Hide all of your layers except the black stars, and Merge Visible again.
Unhide all of the layers, and make sure your stars are right above the pixel text layer.
Selections - Select All, Selections - Float, Selections - Defloat, Selections - Invert
Click on your pixel text layer now and hit the delete key, to delete the excess.
Selections - None.
Now hide your 6 black stars layer.
You should now see your pixel text in the shape of the 6 black stars that were there.
8.
Using your preset shape tool again - star, draw out some tiny stars.
I drew some in red, some in black and some in white randomly over top of the blurred star layer.
Add a dropshadow of 0, 0, 20, 2.00 to them.
Using your 'Chocolate Box' font, size: 72, color: red
Type out the word 'Christmas' and lower it to bottom of the tag.
Selections - Select All, Selections - Float, Selections - Defloat, add a new raster layer
Lower it beneath the 'Christmas' text layer and floodfill it with white.
Add a dropshadow of 1, 1, 30, 3.00.
Effects - Plugins - Eye Candy 4000 - Gradient Glow - Glow Width: 3.00
Click on the 'color' tab in the Gradient Glow box and choose Medium and the color red
This will place a bit of red glow around the white back of your Christmas text to make it pop a bit.
Using the color 'black' type the words 'Star' 5 times in a row.
Lower this layer just above your blurred star, tiny stars and pixel text layers.
Add a dropshadow of 0, 0, 20, 2.00.
Add your copyright, sparkles of choice, the bow (colorized to match) and your name
Now you can call it DONE!
I used the 'Fruitella' font for the name.
♥
©sylvie's tutorials.
Written December 11, 2019.
Subscribe to:
Posts
(Atom)


