Friday, 6 October 2023
15:43 | Edit Post
Tube - ©Ismael Rac - Not available for purchase anymore
But this tube is a Creative Misfits exclusive - join Creative Misfits HERE
Scrap Kit - by Simone at Scrappy Bit of Fun - HERE
Plugins
Xero - Radiance
penta.com - Jeans
Eye Candy 4000 - Gradient Glow
Preset Shape Tool - Circle and Rectangle
(breast cancer ribbon stamp)
Fonts
Kaleenay - 'Get Your Mammogram' text
Pixelette - pixel text
Mask - Vix-Mask458
(not available for download on her website at the moment)
Will update if it is fixed!
~~~~~~~~~~~~~~~~~~~~~~~~~~~~~~~~~~
Okay, let's get started!
File - New - New Image - 750 x 750 - transparent
Grab the frame 'F-001' from the scrap kit and paste to your canvas.
No resizing is necessary
Using a gradient of choice , and preset shape tool, draw a circle and move it beneath the frame.
Convert to a raster layer
I made my own gradient using colors ##fd3395 and white.
Make sure the circle is just within the center of the frame.
Now, using circle preset shape tool again, draw another circle larger than the frame.
Convert it to a raster layer and lower it to the very bottom layer.
Now, using the color #cf4c7d, draw one more circle
Convert it to a raster layer
Adjust
Add/Remove Noise
Add Noise
Random - 38% - Monochrome: Unchecked
Add a dropshadow to this circle, the largest pink circle and the frame
I used 0, 0, 30, 3.00 for all of them.
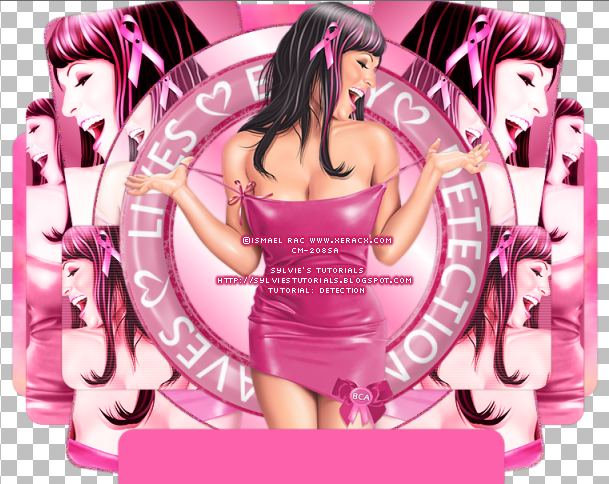
Here is a preview of what I have so far:
2.
Add a dropshadow, I used the same as before.
Duplicate your tube, and move it to the right of your tag over the largest pink circle layer.
Duplicate it again
Now click on the largest pink circle to make it active
Selections - Select All
Selections - Float
Selections - Defloat
Selections - Invert
Click on each of your tube layers over the largest pink circle and hit your delete key
Selections - Select None
Hide all layers except the two tube layers over the circle
Click one of those two tube layers to make it active
Layers - Merge - Merge Visible
Now unhide the rest of the layers
Change the blend mode of the bottom one to Luminance (Legacy)
Change the blend mode of the top one to Screen
Using the color #cf4c7d again, draw a rectangle over the largest circle with tubes layer
and lower it to the bottom layer beneath the circle.
I drew mine with rounded corners
To do this, change the horizontal and vertical radius (at the top of PSP) to 20.00
Using the same method as above, add your tube to this shape you've just drawn on each side
Once you've done this duplicate the tubes
And then like above, change the blend modes to Luminance Legacy (bottom) and Overlay (top)
Hide all layers except the rectangle and the two tubes you've just added
Click one of the layers to make them active.
Layers - Merge - Merge Visible
Now duplicate this merged layer
Effects - Texture Effects - Blinds
Width: 2 - Opacity: 52 - Color: white
And both boxes under color are checked
Click Ok
Now lower the opacity to this layer to 50
This is what I now have:
4.
Using your Raster Deform Tool, rotate it a smidgeon to the left.
Duplicate it and then Image - Mirror so it's now on the left too
Now duplicate it, and then Image - Flip
Move it so it comes from the bottom of the tag to the right this time
Now hide all layers except these four rectangles
Layer - Merge - Merge Visible
Unhide the other layers
Selections - Select All
Selections - Float
Selections - Unfloat
Selections - Modify - Expand by 3
Selections - Select None
Adjust - Add/Remove Noise - Add Noise
Lower this layer to the very bottom
Here is what I have so far:
4.
Now, add your tube to the rotated rectangles you just made in the above step.
Place them exactly where you want them.
For me, I added the face to the top ones, but focused on the breasts for the bottom ones
They pretty much get hidden with some elements and stuff anyway..
Now, using the color #cf4c7d, draw a rectangle at the left of the tag
Lower this layer to the very bottom
Convert to a raster layer
Duplicate the layer - Image - Mirror
Add your tube using same method as above to each rectangle
Now draw a rectangle again, smaller in size and move to the bottom of the tag.
I covered the bottom part of the tube with it
Add a dropshadow again, same as before
5.
Open paper 'P-003' in PSP and resize it by 54%
Add the paper to your Material Palette
Using the paper, with the Preset Shape Tool, draw a rectangle coming out from the top of the tag.
Convert to a raster layer
Now duplicate it, and Image - Flip so it's at the bottom now too.
Now, using the same paper, make a rectangle on either side of the tag, a bit smaller than previous rectangles.
Add a dropshadow to all of these, same as before
You can also change the color of your rectangles by changing the Hue & Saturation
Here is what my tag looks like so far:
6.
Here are the elements from the kit I added:
I used the same dropshadow as above on each.
Check my tag for placement
E-005b - resize by 30%
E-007 - resize by 80%
E-004 - resize by 70%
(used the one on right side)
E-024 - resize by 25%
E-023 - resize by 40%
E-021 - resize by 40%
(used just one of the hearts)
7.
Using the rectangle preset shape tool again
Horizontal and Vertical Radius set to 0 now
Draw two small rectangles at each side of the tag, coming from behind the frame & circle layer.
Now I added a tube to the circle underneath the frame
Trim your tube and add it to each side
I used the blend mode 'Overlay'
Using your Pixelette font, type the words 'Early Detection Saves Lives'
I typed it on repeat, 3x each line and placed it over the rectangle at the very bottom of the tag
using the color #ca2461
Now, using the Kaleenay font, size 48
Type the words 'Get Your Mammogram'
Now add your watermark, some sparkles of choice and your mask!
Thank you for following along with my tutorial.
© sylvie's tutorials.
Written October 6, 2023.
Subscribe to:
Post Comments
(Atom)
-me-


Hello Sylvie, Superb tutorial and blog I love it!!!
ReplyDelete