Wednesday, 14 September 2022
15:41 | Edit Post
Happy Halloween
Tube - Ismael Rac - 2013 Pumpkin Carver - No longer for sale, but any tube will do
Template 052 - Simple Halloween - by me - sylly creationz - Download HERE
Gradients of choice - i used a number of gradients from Tonya's Temptations - Blog HERE
(i used HalloBoo & Autumness - miss you so much Tonya)
♥
Autumn Pattern Background - at Clean Png - HERE
Autumn Leaves - at Clean Png - HERE
Mask - Fall Mask 8 by Dangerously Delicious Designs - HERE
Fonts Used - Mussica Swash (for the name)
My Supplies - HERE
(please let me know if you get your downloads back up Lori, and i'll gladly link you!)
1.
Open the template, Shift + D to duplicate it, and close off the original.
Paste the tube you are using onto the canvas, I resized the tube by 50%.
Grab your gradient of choice and put it in your material palette
Selections - Float
Selections - Defloat
Add a new raster layer
Floodfill with the gradient
Duplicate your tube and move it over top of the rectangle where you want it
Lower the layer right above the rectangles
Selections - Invert
Click on the tube layer and hit the delete key
Selections - None
Add a dropshadow to the gradient rectangles layer
(I used 0, 0, 40, 4.00)
Click on the 'text: pixel' layer and change the blend mode to 'Screen'
2.
Make the 'black square' layer active
Selections - Float
Selections - Defloat
Add a new raster layer
Floodfill with the color #fb7700
Use the plugin Penta.Com - Jeans (default settings)
Add a dropshadow, same as above.
Now, make the '2 small rectangles' layer active.
Selections - Select All
Selections - Float
Selections - Defloat
Add a new raster layer
Floodfill with the color #fb7700 again
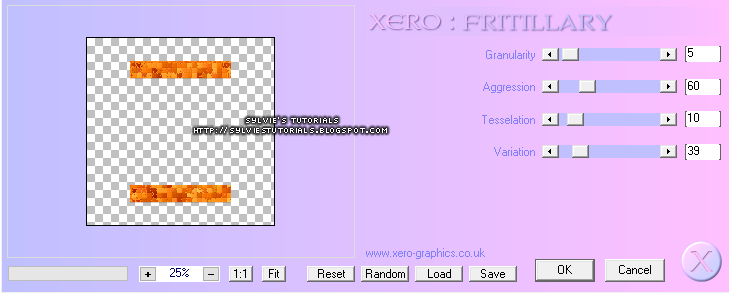
And now use the plugin Xero - Fritillary - settings below

3.
Make the '4 orange squares' layer active.
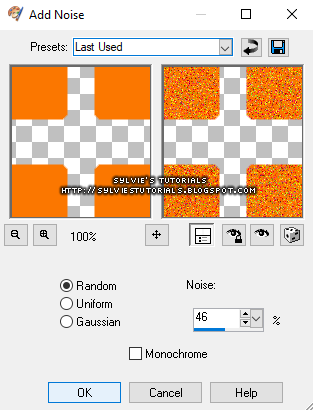
Adjust - Add/Remove Noise - Add Noise
settings below

Click on the 'text: HALLOWEEN' layer
Go back to Add Noise again, except lower the noise to 14.
Click Ok.
Now, click on the 'text: HAPPY' layer and do the same thing
Click on both of the text: White Back layers and add a dropshadow.
Now, use the plugin Eye Candy 4000 - Gradient Glow
Glow Width: 3.00
Now click on the 'color' tab
Choose 'thin' and add the color black
Do this to both text: white back layers
Click on the '4 black squares' layer now
Add a dropshadow and Effects - Texture Effects - Blinds
4.
Make your '4 squares' layer active now.
Paste a closeup of your tube over the layer and place it where you want.
I placed one over each square.
Selections - Select All
Selections - Float
Selections - Defloat
Selections - Invert
Click on the tubes layers and hit the delete key with each one.
Hide all layers and then merge your tube layers together.
Layers - Merge - Merge Visible
Selections - None
Duplicate your tubes layer
Change the blend mode of the bottom one to Luminance (Legacy)
Change the blend mode of the top one to Soft Light
Add a dropshadow.
Now unhide the rest of your layers again.
5.
Open the 'Autumn Pattern Background' downloaded from Clean Png.
Resize by 17%.
Add a dropshadow of 0, 0, 30, 3.00
Add it to the right hand top corner coming out from behind all layers.
Duplicate - Image - Mirror
Duplicate - Image - Flip
Duplicate - Image - Mirror
Open 'Autumn Leaves' now and resize by 3%
I cut each individually, and then pasted one of each various places on the tag
Lastly, grab the file in my supplies.
I used the cat, the hanging spider and the bat.
Now add your mask, sparkles of choice, copyright and save.
♥
Avatar that I made to go with the tag to make a 2 piece set.
Written September 14, 2022.
Labels:halloween,happy halloween,sexy
Subscribe to:
Post Comments
(Atom)
-me-


0 comments:
Post a Comment