Tuesday, 20 June 2023
20:39 | Edit Post
PSP ADDICT
SUPPLIES NEEDED
Tube by ©Amber - VMArtists - HERE
Vix Mask 229
Preset Shape - rectangle
Plugin - penta.com
1.
File - New - New Image - 750 x 750 - transparent
Frame 3 from the scrap kit, paste to your canvas - no resizing
Add a dropshadow - I used 0, 0, 30, 3.00
Now paste your tube to your canvas, I resized by 45%
And added the very same dropshadow
Duplicate it, and then Image - Mirror so it's now on the left side too.
In your Material Palette - add these two colors to match the kit:
#353543 & #fe8fa6
Now using those colors, make your own gradient
Angle: 42 Repeats: 4
Using your magic wand tool, click on the inside of one of the round frames
Selections - Invert
Selections - Modify - Expand by 5
Floodfill with the gradient
Selections: None
Duplicate the gradient layer
Image - Mirror
Now add a dropshadow on the round frames, same as before
2.
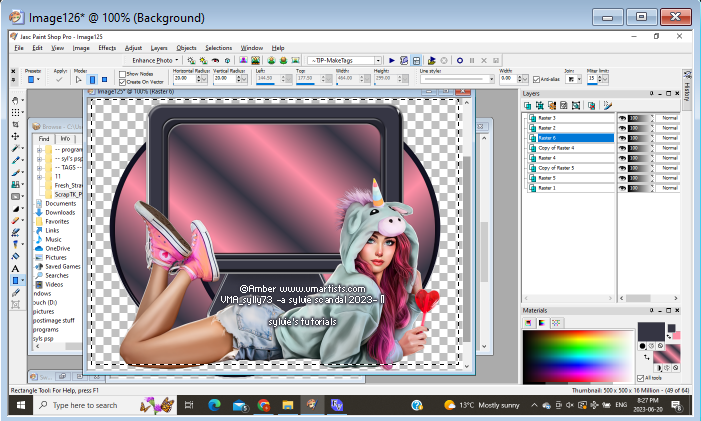
Now, I've taken a screen shot of my laptop screen with PSP open on it.
On your computer/laptop, hit the 'prt sc' key (print screen)
In your PSP program, paste it and then draw a selection around the part you want.

Now, paste it beneath the first frame in center of your canvas
Resize as necessary
Using your rectangle preset shape, draw a rectangle with the gradient from earlier
just so it fits that very same center frame
Duplicate the screen shot and change the blend modes
Bottom one to Luminance Legacy
Top one to Soft Light
3.
Now add a bit of the tube you would like to have in the side circle frames
(I used part of my main tube)
Paste the tube bit over the gradient in the circle
Selections - Select All
Selections - Float
Selections - Defloat
Selections - Invert
Now click on the tube layer and hit the delete key to chop excess
Selections - None
Duplicate this tube layer
Image - Mirror
Now you should have one on each side.
Duplicate each of them and change the blend modes
Bottom layers: Luminance Legacy
Top layers: Screen
Make one of your circle frames active by clicking on the layer
Selections - Modify - Expand by 4
Add a new raster layer and lower beneath the frame layer
Floodfill with the gradient again
Selections - None
Adjust - Add/Remove Noise - Add Noise
Random - 37% - Monochrome: checked
Click Ok
Now add a dropshadow, I used 0, 0, 40, 4.00
Click on the frame layer now to make it active
Effects - Plugins - penta.com - color dot - default settings
Do the same to the frame on the other side.
This is what you should have now:
4.
Now add these elements below.
See my tag for reference, or you can put your elements elsewhere on the tag
Totally up to you!
Element 2 - resize by 60%
Open wordart 2 and paste to the canvas - no resize necessary
I added a dropshadow, I used 1, 1, 50, 5.00
Image - Rotate - Free Rotate - to the right by 90%
Now, add your mask, copyright, sparkles of choice and the name.
We are FINISHED!
Written June 20, 2023.
Labels:pink,psp addict
Subscribe to:
Post Comments
(Atom)
-me-


0 comments:
Post a Comment